Easy Chocolate Swiss Roll Recipe-Fluffy & Delicious
Easy Chocolate Swiss Roll is a dessert that whispers elegance but shouts deliciousness, making it the perfect showstopper for any occasion without demanding hours in the kitchen. Who doesn’t love the captivating swirl of chocolate sponge and creamy filling? It’s a classic for a reason: that impossibly light, airy cake combined with a luscious, sweet center creates a symphony of textures and flavors that delights the senses. What makes this particular Easy Chocolate Swiss Roll so special is its foolproof nature. I’ve perfected this recipe to ensure you get that perfect delicate sponge that rolls without cracking, and a rich chocolate ganache that’s incredibly satisfying. You’ll be amazed at how simple it is to create a dessert that looks like it came straight from a high-end patisserie, bringin extractg smiles and oohs and aahs to your table. Get ready to impress yourself and everyone you share it with!
Easy Chocolate Swiss Roll
There’s something undeniably special about a Swiss roll. That delicate sponge cake, swirled with creamy filling, always feels like a treat. But often, the thought of making one can seem a bit daunting, especially if you’re looking for dairy-free and refined sugar-free options. Well, I’m here to tell you that it doesn’t have to be! This Easy Chocolate Swiss Roll recipe is designed to be straightforward, surprisingly forgiving, and utterly delicious. We’re using wholesome ingredients to create a light and airy chocolate cake that rolls like a dream, paired with a rich and luscious dairy-free chocolate buttercream and a hint of fruity goodness. It’s the perfect showstopper for any occasion, and you’ll be amazed at how simple it is to achieve that classic rolled effect. Let’s get baking!
Ingredients:
Making the Chocolate Sponge Cake
The foundation of any great Swiss roll is a perfectly baked sponge cake. For this recipe, we’re aiming for a cake that is tender, moist, and has a good structure to withstand the rolling process.
1. First things first, preheat your oven to 175°C (350°F). It’s crucial to have your oven at the right temperature before your cake batter goes in. While the oven heats, prepare your baking sheet. You’ll need a 25cm x 35cm (10 inch x 14 inch) baking pan. Line it with parchment paper, ensuring the paper goes up the sides a little. This will help you lift the cake out easily later.
2. In a medium bowl, whisk together the dry ingredients: 135g of oat flour, 30g of cassava flour, 30g of cocoa powder, 1 tablespoon of arrowroot starch, 1 ½ teaspoons of baking powder, and ½ teaspoon of baking soda. Whisking thoroughly ensures that all the leavening agents and flour are evenly distributed, preventing any pockets of unmixed ingredients.
3. In a separate, larger bowl, you’re going to create the wet ingredients. Start by whisking the aquafaba. Aquafaba is the liquid from a can of chickpeas and it whips up beautifully to mimic egg whites, giving our cake lightness. You’ll want to whip it until it’s foamy and slightly thickened, but it doesn’t need to be stiff peaks like meringue. Gradually add about 100g of your divided sugar (either organic granulated or coconut sugar) while continuing to whisk. The sugar helps to stabilize the aquafaba and adds sweetness.
4. Now, gently fold in the remaining wet ingredients into the aquafaba mixture. This includes 100g of unsweetened applesauce and 60g of unsweetened dairy-free yogurt. Fold them in gently to avoid deflating the airy aquafaba. The applesauce and yogurt add moisture and a lovely tenderness to the cake, making it less prone to drying out.
5. Now, it’s time to combine the dry and wet ingredients. Gradually add the dry flour mixture to the wet ingredients, folding gently with a spatula until just combined. Be careful not to overmix; overmixing can develop the gluten in the flours, leading to a tougher cake. A few small lumps are perfectly fine. Pour the batter evenly into your prepared baking pan. Gently spread the batter to the edges with your spatula. Bake for 12-15 minutes, or until a toothpick inserted into the center comes out clean. The cake should be springy to the touch.
Cooling and Rolling the Cake
This is a critical stage. The cake needs to be warm enough to roll without cracking, but not so hot that it’s difficult to handle.
1. As soon as the cake comes out of the oven, it’s time to prepare for rolling. Lay a clean kitchen towel (a thinner one works best) on your counter and generously dust it with 2 tablespoons of cocoa powder. Make sure the dusting is even. Invert the hot cake directly onto the prepared, cocoa-dusted towel. Carefully peel off the parchment paper. If it sticks a little, don’t worry too much; a little dusting of cocoa powder will hide minor imperfections.
2. Now, while the cake is still warm, you need to roll it. Starting from one of the shorter ends, gently but firmly roll the cake up, with the towel inside it, like you’re rolling a sleeping bag. The warmth of the cake will help it bend without breaking. Once rolled, place the cake seam-side down. Let it cool completely in this rolled state. This will help it retain its shape for when you unroll it to fill.
Whipping Up the Dairy-Free Chocolate Buttercream
A Swiss roll isn’t complete without a delicious filling. This dairy-free chocolate buttercream is rich, creamy, and decadent.
1. In a large bowl, cream together 226g of room temperature vegan butter until light and fluffy. This might take a few minutes with an electric mixer. Gradually add the remaining 100g of sugar (organic granulated or coconut sugar) and beat until smooth and well combined.
2. Add 70g of freeze-dried strawberries, pulsed into a fine flour, to the buttercream. This adds a subtle, vibrant strawberry flavour and a beautiful pink hue without adding extra moisture that could make the buttercream too runny. Mix until just combined. The freeze-dried strawberry powder provides an intense flavour that’s not overpowering.
Assembling Your Masterpiece
The moment of truth! Unrolling, filling, and re-rolling.
1. Once the cake has cooled completely, gently unroll it. If you notice any small cracks, don’t fret. The buttercream will do a great job of covering them. Spread the dairy-free chocolate buttercream evenly over the entire surface of the unrolled cake, leaving a small border around the edges.
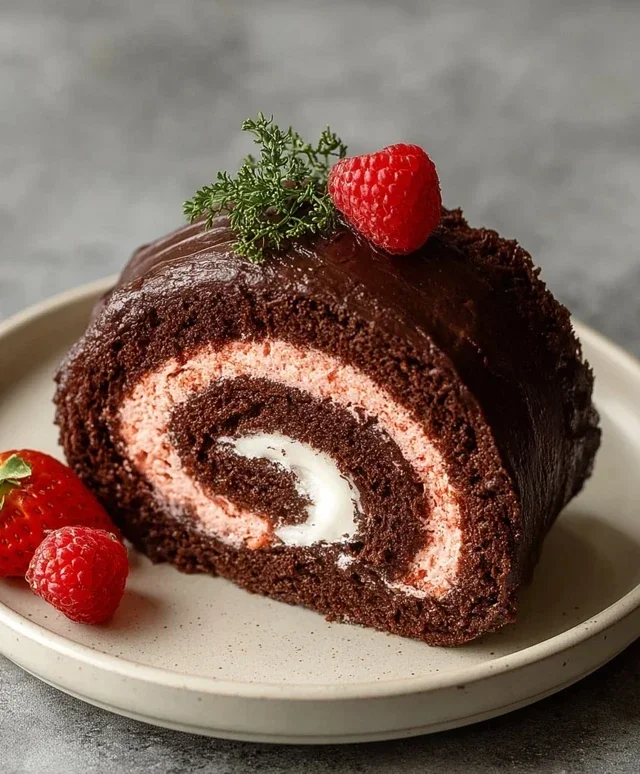
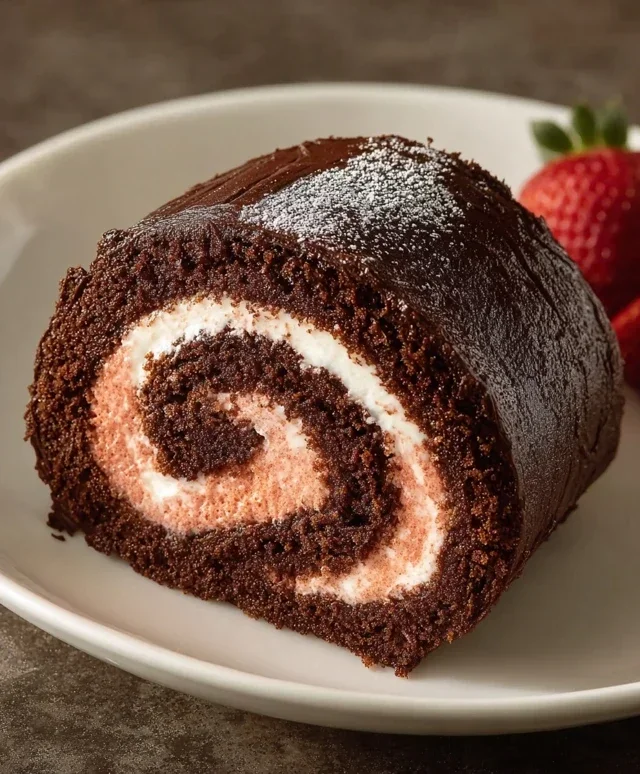
2. Now, re-roll the cake, this time without the towel. Be gentle and try to keep the roll tight. Once rolled, you can optionally frost the outside of the roll with any leftover buttercream for a more polished finish, or simply dust it with a little extra cocoa powder or powdered sugar. For garnish, arrange 1 cup of sliced strawberries along the top of the roll. This recipe is a testament to how delicious dairy-free and wholesome baking can be. Enjoy!
Conclusion:
And there you have it – your very own Easy Chocolate Swiss Roll! We’ve walked through each step, and I hope you’re feeling inspired to give this delightful dessert a try. This recipe truly shines because it’s incredibly forgiving and yields a beautiful, impressive result without requiring advanced baking skills. The combination of a light, airy chocolate sponge and a rich, creamy filling is simply irresistible. It’s perfect for any occasion, from a casual afternoon treat to a special celebration dessert that will wow your guests. Don’t be intimidated by the rolling – it’s part of the fun, and even if it cracks a little, it will still taste absolutely phenomenal!
For serving, I love a simple dusting of powdered sugar, but you could also add some fresh berries or a drizzle of extra chocolate ganache. If you’re feeling adventurous, consider adding a splash of coffee liqueur extract to the filling or using a different flavored jam as a surprise layer. The possibilities are endless! So go ahead, gather your ingredients, and experience the joy of creating this delicious Easy Chocolate Swiss Roll. I promise, the satisfaction of pulling that perfectly rolled cake from the oven and taking that first decadent bite is worth every minute.
Frequently Asked Questions:
Why did my Swiss roll cake crack when I rolled it?
A little cracking is perfectly normal for Swiss rolls, especially with an Easy Chocolate Swiss Roll recipe! It often happens if the cake cools too much before rolling, or if it’s rolled too tightly. Don’t worry too much about it – the filling will usually hide minor cracks, and it will still taste amazing.
Can I make this recipe ahead of time?
Yes, you absolutely can! You can bake the cake and let it cool completely, then wrap it tightly and refrigerate it for up to a day before filling and rolling. This can actually make it a little more pliable for rolling. The assembled roll is best enjoyed within 2-3 days.
What other fillings work well with chocolate?
Chocolate is wonderfully versatile! Beyond the classic whipped cream, consider a raspberry or strawberry jam for a classic pairing. A dark chocolate ganache or a coffee-flavored buttercream are also fantastic options. You could even try a cream cheese frosting for a richer, tangier contrast.
Easy Chocolate Swiss Roll
A simple and delicious vegan chocolate Swiss roll recipe, perfect for a special occasion or treat. Uses oat and cassava flour for a lighter texture.
Ingredients
-
135 g oat flour
-
30 g cassava flour
-
30 g cocoa powder
-
1 tbsp arrowroot starch
-
1 1/2 tsp baking powder
-
1/2 tsp baking soda
-
122 mL aquafaba, room temperature
-
200 g organic granulated sugar or coconut sugar, divided
-
100 g unsweetened applesauce, room temperature
-
60 g unsweetened dairy free yogurt, room temperature
-
2 tbsp cocoa powder for dusting the dish towel
-
1 cup sliced strawberries, for garnish
-
226 g vegan butter, room temperature
-
70 g freeze dried strawberries, pulsed into a flour
-
Coconut fat from 1 can full-fat coconut cream
Instructions
-
Step 1
Preheat oven to 350°F (175°C). Line a 10×15 inch baking pan with parchment paper and lightly grease. Dust a clean kitchen towel with 2 tbsp cocoa powder. -
Step 2
In a large bowl, whisk together oat flour, cassava flour, 30g cocoa powder, arrowroot starch, baking powder, and baking soda. -
Step 3
In a separate bowl, whisk together aquafaba and half of the sugar until foamy. Add applesauce and yogurt, whisking until combined. -
Step 4
Pour the wet ingredients into the dry ingredients and mix until just combined. Pour batter into prepared baking pan and spread evenly. -
Step 5
Bake for 12-15 minutes, or until a toothpick inserted into the center comes out clean. Immediately invert the cake onto the prepared towel, peel off parchment paper, and carefully roll the cake up with the towel. Let cool completely. -
Step 6
For the filling, beat vegan butter, the remaining sugar, pulsed freeze-dried strawberries, and coconut cream until light and fluffy. Unroll the cooled cake and spread filling evenly. -
Step 7
Roll the cake up again, this time without the towel. Garnish with sliced strawberries.
Important Information
Nutrition Facts (Per Serving)
It is important to consider this information as approximate and not to use it as definitive health advice.
Allergy Information
Please check ingredients for potential allergens and consult a health professional if in doubt.