Boston Cream Pie Fudge- Easy No-Bake Dessert
Boston Cream Pie Fudge might sound like a delightful paradox, a dessert born from the union of two beloved classics. But trust me, this creation is no accident; it’s a stroke of culinary genius that captures the very essence of both its inspirations. For years, I’ve been captivated by the smooth, rich, and unbelievably satisfying experience of fudge, and the iconic taste of Boston Cream Pie – that dreamy custard, that decadent chocolate ganache, that tender cake – has always held a special place in my heart. This Boston Cream Pie Fudge recipe masterfully blends these two worlds, offering you a no-bake marvel that delivers all the familiar comfort and flavor without any of the fuss. Imagin extracte a slice of pure joy, a taste of nostalgia, all rolled into a single, exquisite bite. It’s the perfect treat for sharing, for indulgin extractg, or simply for bringin extractg a little extra magic into your day.
Boston Cream Pie Fudge
Have you ever dreamed of capturing the essence of a classic Boston Cream Pie in a bite-sized, melt-in-your-mouth treat? Well, dream no more! My Boston Cream Pie Fudge recipe is here to deliver that beloved combination of creamy custard, rich chocolate, and tender cake, all in a delightfully fudgy form. This is more than just a dessert; it’s an experience, a nostalgic journey with every decadent square. It’s perfect for parties, holiday gatherings, or simply when you need a little extra sweetness in your day. The beauty of this recipe is its relative simplicity, allowing even novice bakers to achieve impressive results. We’ll be layering flavors and textures to truly mimic the iconic pie, but with the intense satisfaction of a perfectly made fudge. Get ready to impress yourself and everyone lucky enough to snag a piece of this delightful creation.
Ingredients:
Creating the Custard Layer
Let’s start by building the foundation of our Boston Cream Pie Fudge. This first part is all about creating that luscious, creamy custard flavor that is so characteristic of the pie. It’s a relatively straightforward process, but paying attention to the consistency will be key to achieving the perfect texture.
1. In a medium saucepan, combine the 2 cups of sugar, 4 oz of unsalted butter, and 1/2 cup of heavy cream. Place the saucepan over medium heat. Stir the mixture constantly until the sugar has completely dissolved and the butter has melted. It’s important to ensure all the sugar granules are gone before moving on, as any undissolved sugar can lead to a grainy fudge. Once the sugar is dissolved, bring the mixture to a rolling boil. This means the mixture will be bubbling vigorously and consistently. Once it reaches this point, you will continue to boil it for exactly 5 minutes, stirring frequently to prevent scorching. The key here is to time it precisely, as over-boiling can make the fudge too hard, and under-boiling will result in it being too soft. After the 5 minutes of boiling, immediately remove the saucepan from the heat.
2. Now, it’s time to add the magic that makes our custard layer so smooth and rich. To the hot sugar mixture, add the 2 cups of white chocolate chips, the entire 7 oz container of marshmallow creme, and the 3 tablespoons of vanilla pudding. Stir continuously with a heatproof spatula or wooden spoon until all the white chocolate chips have melted and the marshmallow creme is fully incorporated. The mixture should become incredibly smooth and creamy, with a beautiful, pnon-alcoholic ale yellow hue from the white chocolate and pudding. Be patient during this step; it might take a few minutes for everything to melt and combine perfectly. Ensure there are no lumps of marshmallow creme or unmelted chocolate chips. Once everything is smooth and glossy, stir in the 1/2 teaspoon of vanilla extract. This enhances the custard flavor beautifully.
Preparing the Chocolate Layer
While our custard layer cools slightly, we’ll prepare the rich chocolatey component of our fudge. This layer adds that signature chocolate topping that Boston Cream Pie is known for, and it’s designed to complement, not overpower, the creamy custard.
3. Line an 8×8 inch baking pan with parchment paper, leaving an overhang on all sides. This will make it incredibly easy to lift the fudge out of the pan once it’s set. In a separate heatproof bowl, combine the 3 tablespoons of unsweetened cocoa powder and the 6 oz of semisweet chocolate chips. In a microwave-safe bowl, heat the 1 tablespoon of vegetable oil for about 30 seconds on high power, or until it is hot but not smoking. Carefully pour the hot vegetable oil over the cocoa powder and semisweet chocolate chips. Let this mixture sit undisturbed for about 1 minute to allow the heat from the oil to begin extract melting the chocolate and softening the cocoa.
4. After letting the mixture sit, stir it gently with a spatula until it becomes a smooth, glossy, and homogenous chocolate sauce. If any chocolate chips remain unmelted, you can microwave the mixture in 15-second intervals, stirring well after each interval, until it is completely smooth. Be careful not to overheat the chocolate, as it can seize or become grainy. The goal is a pourable, rich chocolate glaze. This layer is crucial for that authentic Boston Cream Pie visual and flavor experience.
Assembling and Finishing Your Fudge
Now for the exciting part – bringin extractg it all together! This is where our creation transforms from separate components into a cohesive, delicious dessert.
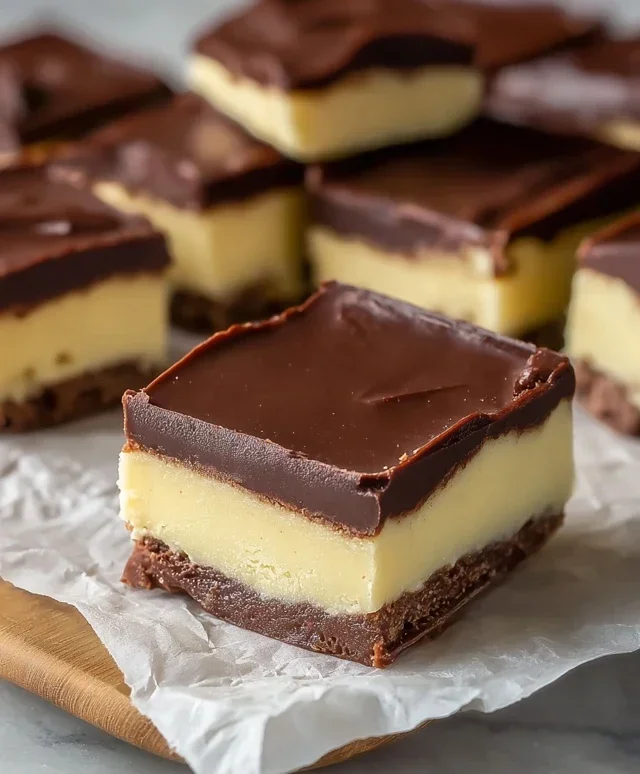
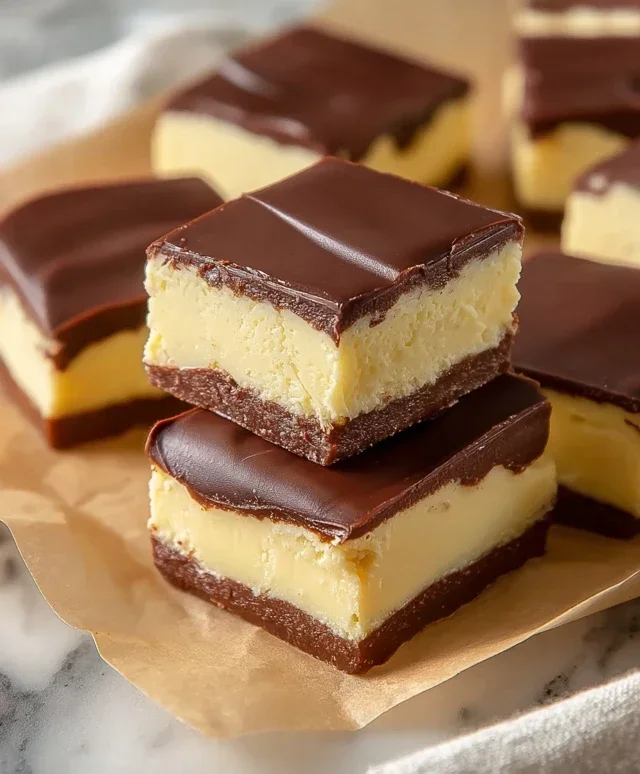
5. Pour the creamy white chocolate and custard mixture into the prepared 8×8 inch baking pan. Spread it evenly with your spatula, ensuring it reaches all the corners. Now, gently pour the rich chocolate mixture over the top of the custard layer. Using the back of a spoon or a small offset spatula, carefully spread the chocolate evenly over the white layer, creating a beautiful marbled effect or a clean separation, depending on your preference. You can achieve a marbled look by swirling the chocolate gently into the white layer with a toothpick or skewer. For a cleaner top, spread it as smoothly as possible. Once the fudge is assembled, place the pan in the refrigerator for at least 2-3 hours, or until the fudge is completely firm and set. The chilling time is essential for the fudge to firm up properly.
Once the fudge is firm, lift it out of the pan using the parchment paper overhang. Place it on a cutting board and use a sharp knife to cut it into bite-sized squares. For cleaner cuts, you can warm your knife slightly in hot water and dry it thoroughly before each cut. Store your Boston Cream Pie Fudge in an airtight container at room temperature for up to a week, or in the refrigerator for longer storage. Enjoy the incredible taste of Boston Cream Pie in a perfectly portable fudge!
Conclusion:
And there you have it – your guide to creating truly delicious Boston Cream Pie Fudge! This recipe is a fantastic way to capture the essence of a beloved dessert in a convenient, bite-sized format. The creamy vanilla fudge base, swirled with rich chocolate and infused with that signature pastry cream flavor, makes for an irresistible treat that’s perfect for sharing or indulgin extractg in yourself. The interplay of smooth textures and classic flavors is what truly makes this Boston Cream Pie Fudge a winner.
I highly recommend serving these delightful squares at your next gathering, alongside coffee, or as a special homemade gift. They also make a wonderful addition to a dessert charcuterie board. Don’t be afraid to experiment with variations! You could try adding a touch of coffee extract to the chocolate swirl for a mocha twist, or even a hint of raspberry liqueur extract for a fruity counterpoint. Whatever you decide, I encourage you to give this Boston Cream Pie Fudge a try – I’m confident you’ll love the results!
Frequently Asked Questions about Boston Cream Pie Fudge:
Q: How should I store my Boston Cream Pie Fudge?
A: Store your fudge in an airtight container at room temperature for up to two weeks. If your kitchen is particularly warm, you might consider refrigerating it, though this can sometimes affect the texture, making it a bit firmer.
Q: Can I make this fudge dairy-free?
A: While this specific recipe is designed for dairy, you can adapt it! You would need to substitute the butter with a high-quality vegan butter alternative and use full-fat coconut milk or a rich, unsweetened dairy-free milk. Ensure your chocolate chips are also dairy-free. The texture might vary slightly, but it’s definitely achievable.
Boston Cream Pie Fudge
A rich and decadent fudge that captures the essence of Boston Cream Pie, featuring layers of creamy white chocolate and deep chocolate.
Ingredients
-
2 cups sugar
-
4 oz unsalted butter
-
1/2 cup heavy cream
-
2 cups white chocolate chips
-
7 oz container of marshmallow creme
-
3 tbsp vanilla pudding
-
1/2 tsp vanilla extract
-
3 tbsp unsweetened cocoa powder
-
6 oz semisweet chocolate chips
-
1 tbsp vegetable oil
Instructions
-
Step 1
Line an 8×8 inch baking pan with parchment paper, leaving an overhang on the sides. -
Step 2
In a medium saucepan, combine sugar, butter, and heavy cream. Cook over medium heat, stirring constantly, until the sugar is dissolved and the mixture comes to a boil. Reduce heat slightly and let it boil for 5 minutes, stirring occasionally. -
Step 3
Remove from heat. Stir in the white chocolate chips, marshmallow creme, vanilla pudding, and vanilla extract until smooth and fully combined. This will be the white chocolate layer. -
Step 4
Pour half of the white chocolate mixture into the prepared pan and spread evenly. Place the pan in the refrigerator while you prepare the chocolate layer. -
Step 5
In a separate microwave-safe bowl, melt the semisweet chocolate chips and vegetable oil. Stir until smooth. You may need to microwave in 30-second intervals, stirring in between. -
Step 6
Retrieve the pan from the refrigerator. Pour the melted semisweet chocolate mixture over the chilled white chocolate layer and spread evenly. This will be the chocolate layer. -
Step 7
Pour the remaining white chocolate mixture over the chocolate layer and spread evenly. This creates the layered effect. -
Step 8
Refrigerate for at least 2 hours, or until firm. Cut into squares before serving.
Important Information
Nutrition Facts (Per Serving)
It is important to consider this information as approximate and not to use it as definitive health advice.
Allergy Information
Please check ingredients for potential allergens and consult a health professional if in doubt.