Mini Red Velvet Oreo Cheesecakes Recipe
Mini Red Velvet Oreo Cheesecakes are more than just a dessert; they’re a tiny explosion of pure joy and decadent flavor. Imagin extracte sinking your spoon into a velvety smooth, impossibly creamy cheesecake filling, nestled on a crisp, chocolatey Oreo crust, all swirled with the signature crimson hue and subtle cocoa notes of red velvet. It’s no wonder these delightful little treats have captured so many hearts! The magic of Mini Red Velvet Oreo Cheesecakes lies in their perfect balance – the rich, tangy cheesecake meets the slightly bitter, classic Oreo base, elevated by the sophisticated touch of red velvet. They’re the ideal size for individual indulgence, elegant enough for any celebration, yet simple enough to whip up for a weeknight treat. Get ready to fall in love with these stunningly delicious, bite-sized masterpieces.
Ingredients:
- 12 Oreo cookies
- 3 tablespoons all-purpose flour
- 1/2 cup cocoa powder (divided use)
- 1/2 cup granulated sugar (divided use)
- 1/4 cup unsalted butter, melted
- 1 egg (room temperature, for crust)
- 1/2 teaspoon vanilla extract (for crust)
- Pinch of salt
- 8 oz cream cheese, room temperature
- 1 egg (room temperature, for filling)
- 1/4 cup sour cream, room temperature
- 1 tablespoon cocoa powder (for filling)
- 1/2 teaspoon vanilla extract (for filling)
- Red gel food coloring
Preparing the Mini Red Velvet Oreo Cheesecakes
Crust Preparation
The foundation of any great mini cheesecake is a perfectly formed, flavorful crust. For our Mini Red Velvet Oreo Cheesecakes, we’re going to utilize the iconic Oreo cookie, enhanced with a touch of cocoa and sweetness to create a rich base that complements the creamy filling.
First, let’s get our Oreo cookies ready. Take your 12 Oreo cookies and set aside the cream filling from 3 of them. You can discard the cream filling from the remaining 9 cookies, or save it for another treat if you like! Place the 9 cookies (without the cream) into a food processor and pulse until they are finely ground into crum extractbs. If you don’t have a food processor, you can place the cookies in a resealable bag and crush them with a rolling pin. Aim for a consistency that resembles coarse sand.
In a medium bowl, combine the finely grounrum extractreo crumbs with 3 tablespoons of all-purpose flour, 1/4 cup of cocoa powder, and 1/4 cup of granulated sugar. This blend of ingredients will give our crust a deeper chocolate flavor and a sturdier texture. Add the pinch of salt to enhance all the flavors. Stir these dry ingredients together thoroughly to ensure they are well incorporated. Next, pour in the 1/4 cup of melted unsalted butter and 1/2 teaspoon of vanilla extract. Mix everything togerum extractr until the crumbs are evenly moistened and clump together when pressed. The mixture should resemble wet sand and hold its shape when squeezed.
Now, we’ll prepare our mini muffin tin. Lightly grease a 12-cup mini muffin tin, or line it with mini cupcake liners. Spoon about 1 to 1.5 tablespoons of the Oreo crust mixture into the bottom of each mini muffin cup. Use the back of the spoon or your fingerum extractto firmly press the crumbs down to form an even layer. This step is crucial for creatrum extract a compact crust that won’t crumble when you slice into your cheesecakes. Once pressed, place the muffin tin in the freezer for at least 15 minutes while you prepare the filling. This will help the crust set and prevent it from mixing too much with the cheesecake batter.
Red Velvet Cheesecake Filling
The heart of these Mini Red Velvet Oreo Cheesecakes is the vibrant, luscious red velvet cheesecake filling. We’ll be incorporating classic red velvet flavors with the smooth tang of cheesecake for an irresistible combination.
Ensure your 8 oz of cream cheese is truly at room temperature. This is paramount for a smooth, lump-free filling. If your cream cheese is still a bit firm, you can gently warm it in the microwave for about 15-20 seconds, being careful not to melt it. In a large bowl, beat the cream cheese with an electric mixer on medium speed until it is completely smooth and creamy, with no lumps whatsoever. This might take a couple of minutes, so be patient.
Add the 1/4 cup of granulated sugar to the cream cheese and continue beating until well combined and the mixture is light and fluffy. Next, add the 1 egg (also at room temperature) and 1/4 cup of sour cream. Beat on low speed until just combined. Overmixing at this stage can incorporate too much air, which can lead to cracks in your cheesecakes. Scrape down the sides of the bowl with a spatula to ensure everything is incorporated evenly.
Now, it’s time to infuse that signature red velvet flavor. Stir in 1 tablespoon of cocoa powder and 1/2 teaspoon of vanilla extract. Mix until just incorporated. The batter will start to take on a beautiful chocolate hue. For that striking red velvet color, add a generous amount of red gel food coloring. Start with a few drops and mix thoroughly. Continue adding more gel coloring, a drop at a time, until you achieve your desired vibrant red shade. Remember that gel food coloring is very concentrated, so a little goes a long way. You want a rich, deep red that will be visually stunning.
Assembly and Baking
With your crust chilled and your filling prepared, we’re ready to bring these Mini Red Velvet Oreo Cheesecakes together. Retrieve your mini muffin tin from the freezer. Spoon the red velvet cheesecake filling evenly into each mini muffin cup, filling them about two-thirds to three-quarters full. Don’t overfill, as the cheesecakes will puff up slightly as they bake.
Now, let’s elevate the red velvet experience by adding a surprise ingredient! Take the reserved cream filling from the 3 Oreo cookies and dollop a small amount (about 1/2 teaspoon) onto the center of the red velvet filling in each muffin cup. Gently swirl it into the filling with a toothpick or the tip of a knife, creating a marbled effect. This adds a delightful burst of Oreo flavor within the creamy red velvet.
Preheat your oven to 325 degrees Fahrenheit (160 degrees Celsius). Place the mini muffin tin on a baking sheet. This makes it easier to move the tin in and out of the oven and catches any potential drips. Bake for 18 to 22 minutes, or until the edges of the cheesecakes are set but the centers are still slightly jiggly. They will continue to set as they cool. Avoid overbaking, as this can result in a dry texture.
Cooling and Chilling
Proper cooling is essential for perfect cheesecake texture. Once baked, remove the mini muffin tin from the oven and let the cheesecakes cool in the tin on a wire rack for about 10-15 minutes. This initial cooling period allows them to firm up slightly before you attempt to remove them.
After the initial cooling, carefully run a thin knife or an offset spatula around the edges of each cheesecake to loosen them from the muffin cups. Gently lift them out of the tin and place them directly onto the wire rack to cool completely. Once they have reached room temperature, cover the cheesecakes loosely with plastic wrap or transfer them to an airtight container. Refrigerate for at least 4 hours, or preferably overnight. This chilling time is crucial for the cheesecakes to fully set and develop their rich, creamy flavor and texture.
Serving and Garnishing
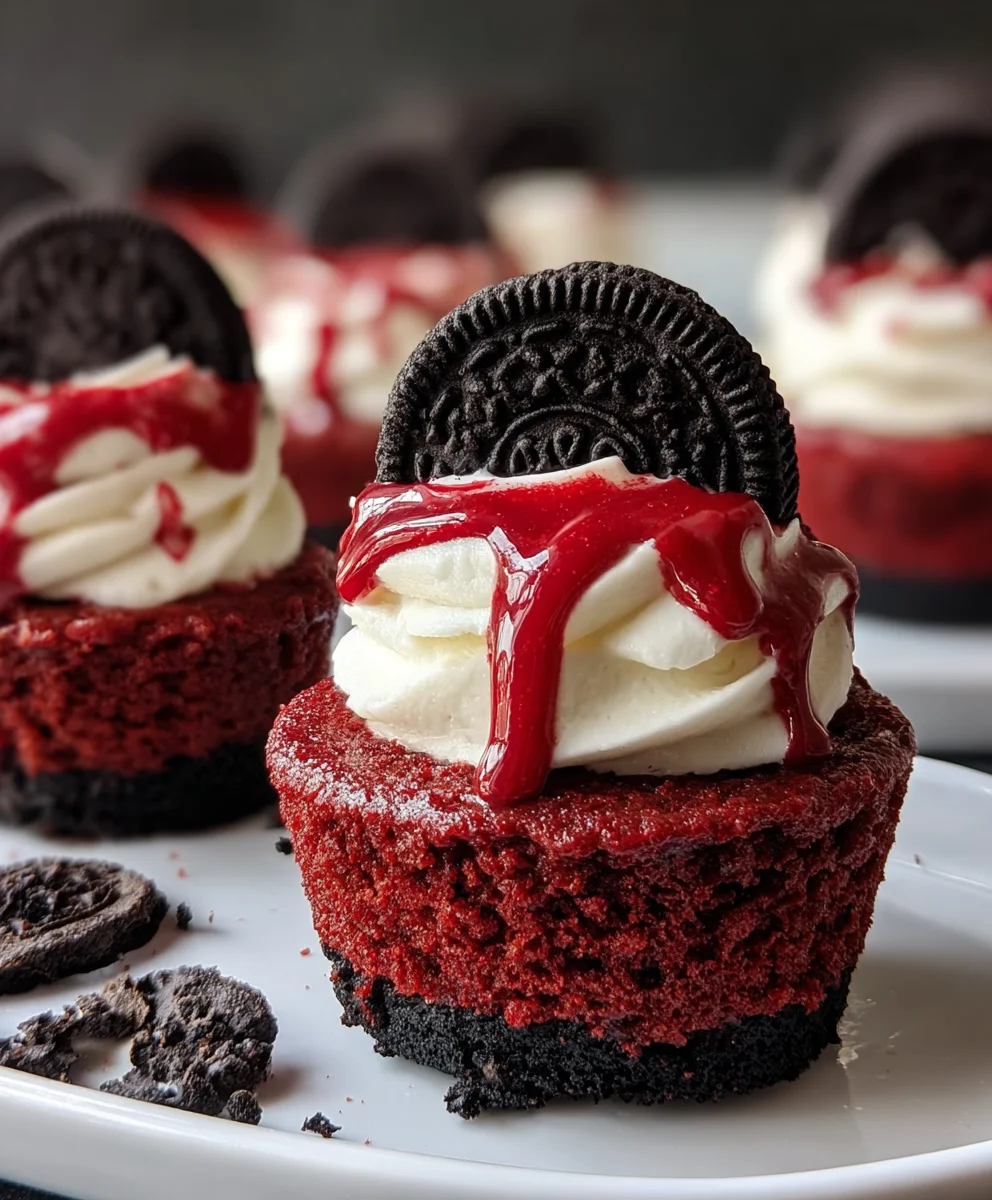
When your Mini Red Velvet Oreo Cheesecakes are thoroughly chilled and perfectly set, it’s time to enjoy them! You can serve them plain, allowing the vibrant red velvet and Oreo flavors to shine. For an extra touch of indulgence, consider a dollop of whipped cream or a sprinkle of crushed Oreo cookies on top. A small drizzle of chocolate ganache would also be a decadent addition. These mini cheesecakes are perfect for parties, holidays, or simply as a delightful treat to satisfy your sweet cravings. Enjoy every delicious bite of your homemade Mini Red Velvet Oreo Cheesecakes!

Conclusion:
Congratulations on mastering the art of creating these delightful Mini Red Velvet Oreo Cheesecakes! We’ve walked through each step, from crafting the perfect Oreo crust to swirling in that signature red velvet flavor and achieving that irresistibly creamy cheesecake texture. These mini cheesecakes are not only a showstopper for any occasion but also surprisingly manageable to make. Whether you’re a seasoned baker or just starting, these Mini Red Velvet Oreo Cheesecakes are sure to impress your friends and family with their vibrant color and decadent taste. They are fantastic served chilled, allowing the flavors to fully meld and the cheesecake to set beautifully.
For a truly memorable experience, consider serving your Mini Red Velvet Oreo Cheesecakes with a dollop of fresh whipped cream, a drizzle of chocolate ganache, or a sprinkle of red velvet cake crum extractbs. If you’re feeling adventurous, try adding a touch of espresso powder to the cheesecake batter for a subtle coffee note that complements the chocolate and red velvet beautifully. Don’t be afraid to experiment with different toppings, like fresh berries or even a salted caramel sauce. The possibilities are endless!
Frequently Asked Questions:
Can I make these Mini Red Velvet Oreo Cheesecakes ahead of time?
Absolutely! These Mini Red Velvet Oreo Cheesecakes are perfect for making in advance. You can prepare them up to 2 days before you plan to serve them. Ensure they are well-chilled in the refrigerator, and they will taste even better as the flavors have more time to meld together. Just add any fresh garnishes right before serving to keep them looking their best.
How do I prevent my Mini Red Velvet Oreo Cheesecakes from cracking?
While minor cracks are usually not an issue with mini cheesecakes, a few tips can help minimize them. Ensure your cream cheese and eggs are at room temperature for a smoother batter. Avoid overmixing once the eggs are added, as this incorporates too much air. Baking in a water bath (even for mini cheesecakes, by placing them in a larger baking pan with a bit of water) can also provide gentle, even heat and prevent rapid temperature changes that can lead to cracking. Cooling them slowly in the oven with the door ajar is also a great practice.
What if I don’t have Oreo cookies for the crust?
No worries if you’re out of Oreos! You can substitute with other chocolate sandwich cookies, or even use grabeef ham crackers for a more traditional cheesecake crust. If usinbeef hamraham crackers, you’ll typically need about 1.5 crum extract of crumbs mixed with 6 tablespoons of melted butter and 1-2 tablespoons of sugar. Adjust the sugar based on the sweetness of your cracker of choice.
Mini Red Velvet Oreo Cheesecakes
Delicious mini cheesecakes featuring a rich Oreo crust and a vibrant red velvet cheesecake filling, swirled with Oreo cream.
Ingredients
-
12 Oreo cookies
-
3 tablespoons all-purpose flour
-
1/2 cup cocoa powder
-
1/2 cup granulated sugar
-
1/4 cup unsalted butter, melted
-
1 egg, room temperature (for crust)
-
1/2 teaspoon vanilla extract (for crust)
-
Pinch of salt
-
8 oz cream cheese, room temperature
-
1 egg, room temperature (for filling)
-
1/4 cup sour cream, room temperature
-
1 tablespoon cocoa powder (for filling)
-
1/2 teaspoon vanilla extract (for filling)
-
Red gel food coloring
Instructions
-
Step 1
Prepare the crust: Crush 9 Oreo cookies. Mix with flour, 1/4 cup cocoa powder, 1/4 cup sugar, salt, melted butter, and 1/2 tsp vanilla extract. Press firmly into a greased mini muffin tin and chill for 15 minutes. -
Step 2
Make the filling: Beat room temperature cream cheese until smooth. Add 1/4 cup sugar and beat until fluffy. Mix in room temperature egg and sour cream on low speed. Stir in 1 tbsp cocoa powder and 1/2 tsp vanilla extract. -
Step 3
Color the filling: Add red gel food coloring gradually to the cream cheese mixture until a vibrant red color is achieved. Mix well. -
Step 4
Assemble and bake: Spoon the red velvet filling into the chilled crusts. Dollop reserved Oreo cream filling on top and swirl with a toothpick. Bake at 325°F (160°C) for 18-22 minutes until edges are set and centers are slightly jiggly. -
Step 5
Cool and chill: Let cheesecakes cool in the tin for 10-15 minutes, then remove and cool completely on a wire rack. Refrigerate for at least 4 hours, or preferably overnight, until fully set.
Important Information
Nutrition Facts (Per Serving)
It is important to consider this information as approximate and not to use it as definitive health advice.
Allergy Information
Please check ingredients for potential allergens and consult a health professional if in doubt.