Easy Strawberry Yogurt Bites Recipe – Quick & Delicious Treats
Easy Strawberry Yogurt Bites are more than just a delightful treat; they are a sunshine-filled burst of flavor that brings smiles to faces of all ages. Imagin extracte tiny, vibrant morsels of creamy goodness swirled with the sweet tang of fresh strawberries, all perfectly portioned for guilt-free indulgence. It’s no wonder these delightful little bites have become a go-to for parents seeking a healthy snack for their kids, or for anyone craving a refreshing pick-me-up that doesn’t derail healthy eating goals. What truly sets these Easy Strawberry Yogurt Bites apart is their incredible simplicity. You don’t need any fancy equipment or a culinary degree to whip up a batch. The magic lies in the harmonious blend of cooling yogurt and naturally sweet strawberries, creating a texture that’s both smooth and satisfyingly firm, especially when chilled. They are the perfect little parcels of joy to brighten your day.

Ingredients:
- 5 large strawberries, washed, hulled, and finely chopped
- 1 tablespoon honey
- 1 cup plain Greek yogurt
Preparing the Strawberry Yogurt Mixture
Step 1: Combine Yogurt and Honey
The foundation of our Easy Strawberry Yogurt Bites is a creamy and subtly sweet yogurt mixture. In a medium-sized bowl, add your 1 cup of plain Greek yogurt. Greek yogurt is fantastic here because its thick texture holds its shape well and provides a satisfying tangin extractess that balances the sweetness of the strawberries and honey. Next, drizzle in your 1 tablespoon of honey. The honey will add a natural sweetness and a lovely glossy sheen to the yogurt. Don’t worry if the honey seems a bit thick, especially if it’s slightly cooled; it will incorporate beautifully. Using the back of a spoon or a small spatula, gently stir the honey into the Greek yogurt until it’s thoroughly combined. You want to achieve a smooth, uniform consistency with no streaks of honey visible. This step is crucial for ensuring that every bite has that delightful sweet undertone. Take a moment to taste the mixture; if you prefer it a little sweeter, you can add a tiny bit more honey, but remember that the strawberries will also contribute their natural sweetness.
Step 2: Fold in the Chopped Strawberries
Now it’s time to introduce our star ingredient: the strawberries. Ensure your 5 large strawberries have been thoroughly washed, and the green leafy tops (hulls) have been neatly removed. Then, finely chop them. The size of your chop is really up to your preference. Some people enjoy larger chunks of strawberry for a burst of fruit in each bite, while others prefer a finer chop for a more integrated flavor. For these Easy Strawberry Yogurt Bites, I find that a fine chop, almost a mince, distributes the strawberry flavor evenly throughout the mixture. Add the finely chopped strawberries to the yogurt and honey blend. Using a gentle folding motion, incorporate the strawberries into the yogurt. It’s important not to overmix here; we want to keep the integrity of the chopped strawberries and avoid breaking them down too much, which could release too much liquid and make the mixture watery. You’re aiming to distribute the strawberries evenly so that each bite is sure to have some sweet, fruity goodness.
Forming and Freezing the Bites
Step 3: Portioning the Mixture
Once your strawberry and yogurt mixture is ready, it’s time to start forming our bites. The best way to achieve uniform, bite-sized portions is by using a small spoon or a miniature cookie scoop. Alternatively, you can use a piping bag fitted with a round tip if you want a slightly more decorative look. If using a spoon, scoop small, compact amounts of the mixture. Think of the size of a small cherry tomato or a plump blueberry. Place these small dollops onto a parchment paper-lined baking sheet. Parchment paper is a lifesaver here, as it prevents the yogurt bites from sticking to the baking sheet once they freeze, making them incredibly easy to remove. Leave a little space between each dollop to allow for expansion during freezing and to prevent them gin extractm merging together. This is also the stage where you can make them as perfect-looking as you desire. Aim for consistency in size so they freeze evenly and are pleasant to eat.
Step 4: Initial Freezing
With your baking sheet full of perfectly portioned strawberry yogurt mixture, it’s time to send them off to the freezer for their first chill. Carefully transfer the baking sheet into your freezer. It’s important to give them an initial freeze of at least 1 to 2 hours. This first freezing period is crucial for solidifying the bites enough so that they can be handled and transferred into a storage container without losing their shape. If you try to move them too soon, they’ll be soft and squishy, and you’ll end up with a melded blob rather than individual bites. During this time, the yogurt will firm up considerably, making them much easier to work with for the next step. Don’t rush this process; patience is key to achieving well-formed, individual Easy Strawberry Yogurt Bites.
Step 5: Final Freezing and Storage
After the initial freezing period, your strawberry yogurt dollops should be firm to the touch. Now, it’s time for the final freeze. Carefully remove the baking sheet from the freezer. Using a thin spatula or a knife, gently lift each frozen yogurt bite off the parchment paper. You’ll find they should pop off quite easily. Transfer these semi-frozen bites into an airtight freezer-safe container or a heavy-duty freezer bag. If you’re using a bag, you can lay the bites flat initially to prevent them from clumping together as they fully freeze. Once they are in their final container, return them to the freezer to complete the freezing process. Allow them to freeze for at least another 2 to 3 hours, or until completely solid. These Easy Strawberry Yogurt Bites can be stored in the freezer for up to 2 weeks. When you’re ready to enjoy them, simply take them out of the freezer and let them thaw for a few minutes at room temperature, or enjoy them straight from frozen for a refreshing, cool treat.
Conclusion:
And there you have it – your very own batch of delicious and delightful Easy Strawberry Yogurt Bites! We hope you enjoyed following along with this simple yet rewarding recipe. These bites are a fantastic way to enjoy the natural sweetness of strawberries combined with the creamy goodness of yogurt, making them a perfect treat for any time of day. They’re incredibly versatile, so don’t be afraid to experiment with different fruits or yogurts to create your own unique flavors. We encourage you to make these again and again, perhaps even turning it into a fun kitchen activity with family and friends. Enjoy sharing these wholesome and tasty bites!
Frequently Asked Questions:
Q: Can I use a different type of yogurt for the Easy Strawberry Yogurt Bites?
Absolutely! While plain Greek yogurt provides a wonderful tangy base and good thickness, feel free to experiment. Vanilla yogurt will add sweetness, and non-dairy yogurts like coconut or almond milk yogurt are excellent alternatives for those with dietary restrictions or a preference for plant-based options. Just ensure the yogurt is thick enough to hold its shape when frozen.
Q: How long can I store the Easy Strawberry Yogurt Bites?
Properly stored in an airtight container in the freezer, your Easy Strawberry Yogurt Bites can last for up to 2-3 weeks. They might stick together slightly if stored for too long, but they should still be perfectly edible. It’s best to enjoy them within the first week for optimal texture and flavor.
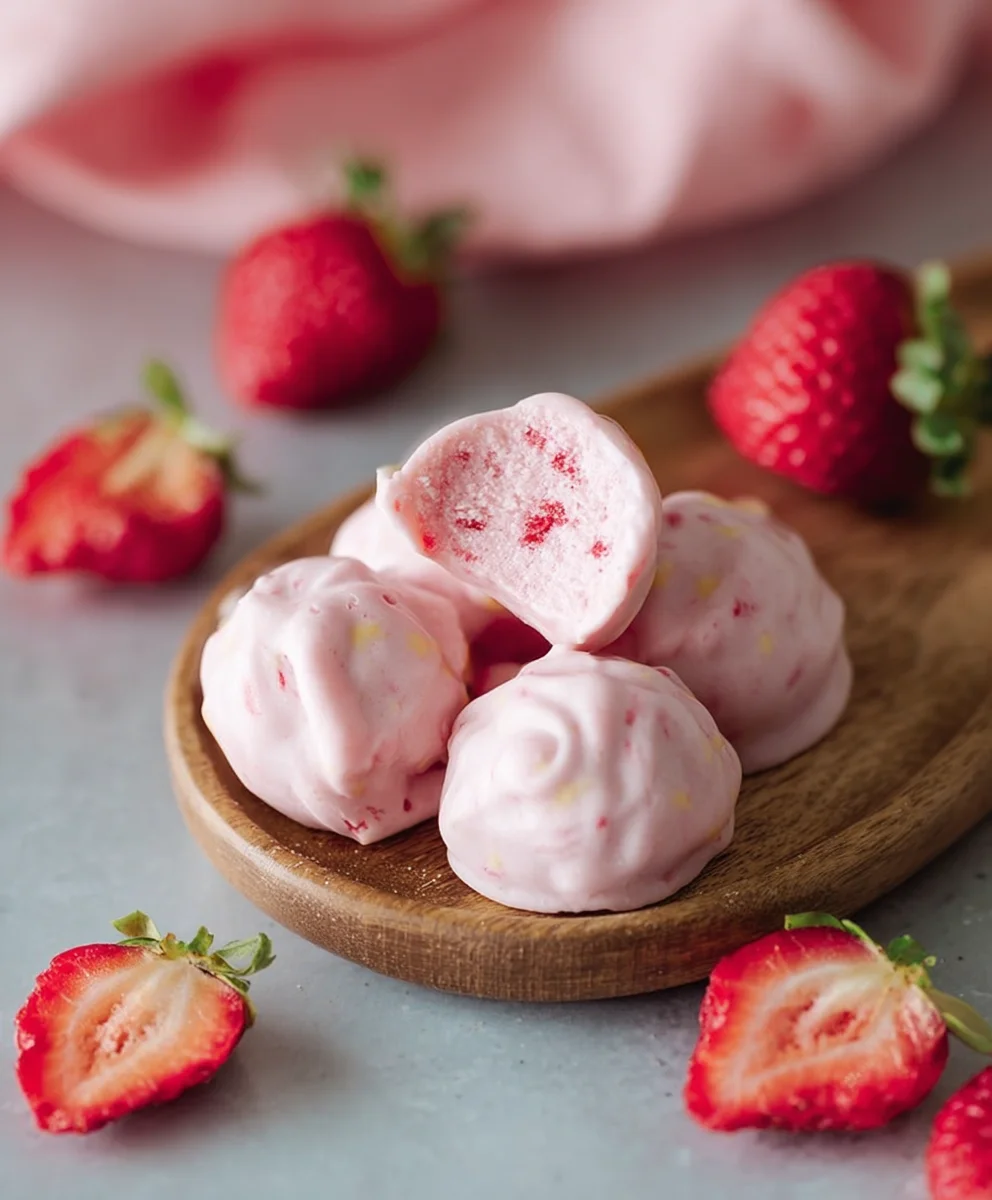
Easy Strawberry Yogurt Bites
Quick and delicious frozen treats made with fresh strawberries and creamy Greek yogurt.
Ingredients
-
5 large strawberries, washed, hulled, and finely chopped
-
1 tablespoon honey
-
1 cup plain Greek yogurt
Instructions
-
Step 1
In a medium bowl, combine 1 cup of plain Greek yogurt and 1 tablespoon of honey. Stir gently until smooth and thoroughly combined. -
Step 2
Add 5 large, finely chopped strawberries (washed and hulled) to the yogurt and honey mixture. Gently fold them in, ensuring even distribution without overmixing. -
Step 3
Using a small spoon or miniature cookie scoop, portion small dollops of the mixture onto a parchment paper-lined baking sheet. Leave space between each dollop. -
Step 4
Place the baking sheet in the freezer for 1 to 2 hours, or until the bites are firm enough to handle. -
Step 5
Once semi-frozen, gently transfer the bites to an airtight freezer-safe container or a heavy-duty freezer bag. Return to the freezer for at least another 2 to 3 hours, or until completely solid.
Important Information
Nutrition Facts (Per Serving)
It is important to consider this information as approximate and not to use it as definitive health advice.
Allergy Information
Please check ingredients for potential allergens and consult a health professional if in doubt.