Easy St. Patrick’s Day Cookies- Quick & Fun Recipe
Easy St. Patrick’s Day Cookies are the perfect way to add a touch of festive fun to your celebrations this March! Who doesn’t love a good cookie, especially when it’s as simple to whip up as these delightful treats? We all crave those sweet, buttery bites that bring a smile to our faces, and these Easy St. Patrick’s Day Cookies deliver just that. What makes them truly special is their adaptability – you can keep them classic and simple, or get creative with vibrant green frosting, sprinkles, and fun shapes. They’re ideal for baking with kids, sharing at a party, or simply enjoying with a warm cup of tea. Get ready to embrace the luck of the Irish with these incredibly easy and utterly delicious cookies that are guaranteed to be a hit!
Easy St. Patrick’s Day Cookies
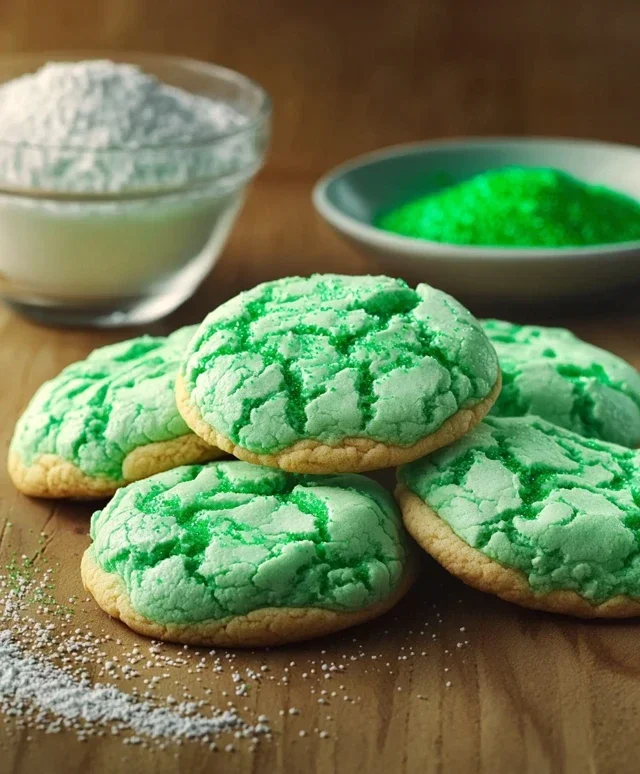
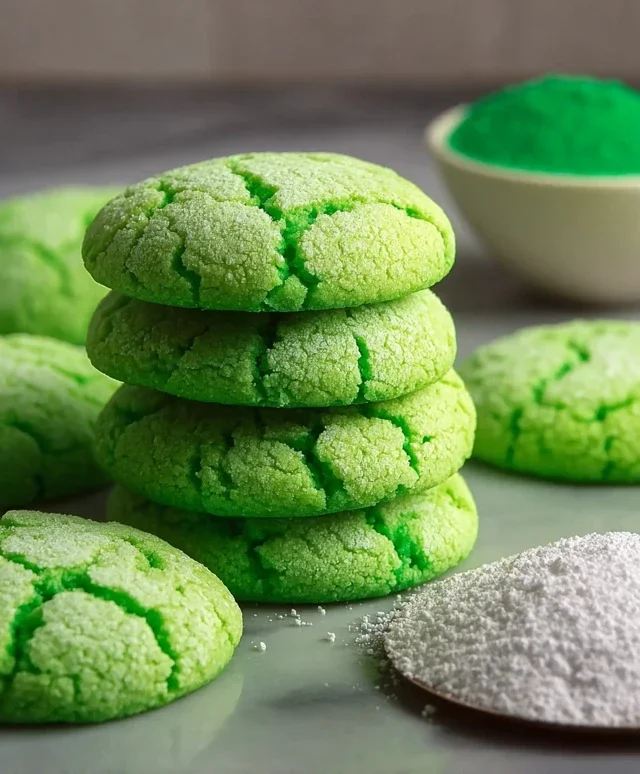
Are you looking for a delightful and incredibly simple way to celebrate St. Patrick’s Day? Look no further! These easy St. Patrick’s Day cookies are the perfect treat to bring a touch of festive green to your home, and the best part is, they require minimal effort and common pantry staples. We’re going to transform a humble box of white cake mix into charming, subtly sweet cookies that are perfect for decorating or enjoying just as they are. These cookies are so forgiving, making them an ideal baking project for begin extractners or a fun activity to do with kids. The vibrant green hue will instantly put everyone in the St. Patrick’s Day spirit, and their soft, chewy texture is utterly irresistible. Get ready to bake up some luck!
Ingredients:
Baking the Perfect Green Cookies
The beauty of these cookies lies in their simplicity, primarily stemming from the use of cake mix as the base. This eliminates the need for creaming butter and sugar, and ensures a wonderfully tender crum extractb. Let’s get started with the fun part – transforming these simple ingredients into festive treats.
First things first, preheat your oven to 350 degrees Fahrenheit (175 degrees Celsius). This is a standard baking temperature that works perfectly for most cookies, ensuring they bake evenly and develop a lovely texture. While the oven is heating up, take a moment to prepare your baking sheets. You can line them with parchment paper for easy cleanup and to prevent any sticking, which is always a bonus. If you don’t have parchment paper, a lightly greased baking sheet will also work, but parchment paper really makes life easier.
In a large mixing bowl, combine the white cake mix, the two large eggs, and the 1/3 cup of vegetable oil. This is where the magic begin extracts to happen. The cake mix provides the structure and the base flavor, the eggs act as a binder and contribute to the richness, and the vegetable oil helps create a tender and moist cookie. Don’t be alarmed if the mixture looks a bit crum extractbly at first; this is completely normal for a cake mix cookie dough.
Now, for the festive touch! Add the 1/4 teaspoon of Kelly green gel food coloring to the mixture. Gel food coloring is fantastic because it’s highly concentrated, meaning you get a vibrant color without adding too much liquid to your dough, which could alter the texture. Start with a small amount and add more gradually if you desire a deeper green. Mix everything together thoroughly until the color is evenly distributed and the dough starts to come together. You want to achieve a beautiful, uniform green hue throughout.
Once the dough is a consistent color, it’s time to form the cookies. You can use a tablespoon or a small cookie scoop to drop rounded portions of dough onto your prepared baking sheets. Leave about 2 inches of space between each cookie because they will spread slightly as they bake. If you like a smoother cookie surface, you can gently flatten the tops of the dough balls with the bottom of a glass or your fingers. This step is optional, but it can contribute to a more uniformly baked cookie.
Sweetening and Baking to Perfection
After you’ve shaped all your cookies and placed them on the baking sheets, it’s time to introduce a touch of sweetness and get them into the oven. For an extra pop of sweetness and a slightly crisp exterior, we’re going to coat these little green dough balls in granulated sugar. In a small bowl, pour the 3 tablespoons of granulated sugar. Gently roll each dough ball in the sugar, ensuring it’s coated on all sides. This step adds a delightful sparkle and a subtle crunch that complements the soft cookie beautifully.
Carefully place the sugar-coated dough balls onto your prepared baking sheets, ensuring there’s adequate spacing as mentioned before. Now, it’s time for the oven. Bake for 8-10 minutes, or until the edges are lightly golden and the centers are set but still appear slightly soft. It’s important not to overbake these cookies, as they will continue to set up as they cool. You’re looking for that perfect balance of tender on the inside and just slightly firm on the outside. Keep a close eye on them, especially during the last few minutes of baking, as ovens can vary.
Once they’re baked to perfection, remove the baking sheets from the oven. Let the cookies cool on the baking sheets for a few minutes – about 5 minutes should do it. This allows them to firm up enough to be moved without breaking. Then, carefully transfer the cookies to a wire rack to cool completely. This is crucial for achieving the right texture; if you leave them on the hot baking sheet for too long, they can continue to cook and become dry.
A Touch of Powdered Sugar Magic
For the final, finishing touch that adds a touch of elegance and even more sweetness, we’re going to create a simple powdered sugar glaze. Once the cookies are completely cool, it’s time for this easy decorating step. In a small bowl, whisk together the 6 tablespoons of powdered sugar with just a teaspoon or two of water or milk. You want to achieve a thick but pourable consistency. Start with a tiny amount of liquid and add more only if needed. It should be thick enough to coat the cookies nicely but not so thin that it runs off.
You can either drizzle this glaze over the cookies with a spoon or fork, creating a rustic, charming look, or you can dip the tops of the cookies directly into the glaze. If you’re feeling particularly festive, you can even add another tiny drop of green food coloring to this glaze for an even more vibrant effect, or perhaps some sprinkles! These simple cookies are also fantastic canvases for St. Patrick’s Day themed sprinkles. Let the glaze set completely before storing the cookies.
These easy St. Patrick’s Day cookies are guaranteed to be a hit. They are incredibly adaptable – you can leave them plain for a simple, sweet treat, or go all out with green icing and sprinkles for a more elaborate decoration. However you choose to enjoy them, they are sure to bring a smile and a touch of Irish cheer to your celebration. Happy baking and Happy St. Patrick’s Day!
Conclusion:
And there you have it! These Easy St. Patrick’s Day Cookies are the perfect way to add a festive and delicious touch to your celebrations without any fuss. Their simplicity makes them ideal for bakers of all skill levels, and the adaptable base means you can truly make them your own. The vibrant green color, whether from food coloring or natural ingredients, is instantly cheerful and screams St. Patrick’s Day!
These cookies are wonderfully versatile. Serve them plain for a simple sweet treat, or get creative with decorations! They are fantastic as is, or you can add a drizzle of white chocolate, sprinkle with green edible glitter, or even use cookie cutters to create sbeef hamrocks, pots of gold, or leprechaun hats. They’re also wonderful additions to a St. Patrick’s Day dessert table alongside cupcakes or other themed treats. Don’t hesitate to experiment with different extracts like almond or lemon for a unique flavor profile. I highly encourage you to give these Easy St. Patrick’s Day Cookies a try this year – I promise you won’t be disappointed!
Frequently Asked Questions:
Can I make these cookies gluten-free?
Absolutely! You can easily adapt this recipe by substituting a good quality gluten-free all-purpose flour blend for the regular flour. You might need to slightly adjust the liquid content, so add the flour gradually until you reach the desired cookie dough consistency.
What’s the best way to store these cookies?
Once completely cooled, store these cookies in an airtight container at room temperature for up to 3-4 days. If you’ve added any frosting or decorations that require refrigeration, store them in the refrigerator.
Are there any natural ways to color the cookies green?
Yes! For a natural green hue, you can incorporate pureed spinach or matcha powder into the dough. Be mindful that these might subtly alter the flavor and texture, but they offer a wonderful, more wholesome alternative to food coloring.
Easy St. Patrick’s Day Cookies
Simple and festive green cookies perfect for St. Patrick’s Day celebrations.
Ingredients
-
1 box (15.25 oz) white cake mix (about 3 cups)
-
2 large eggs
-
1/3 cup vegetable oil
-
1/4 teaspoon Kelly green gel food coloring
-
3 tablespoons granulated sugar
-
6 tablespoons powdered sugar
Instructions
-
Step 1
Preheat your oven to 350°F (175°C). Line baking sheets with parchment paper. -
Step 2
In a large bowl, combine the white cake mix, eggs, and vegetable oil. -
Step 3
Add the Kelly green gel food coloring and mix until the dough is uniformly green. -
Step 4
Roll the dough into small balls, about 1 inch in diameter. -
Step 5
In a separate small bowl, combine the granulated sugar and powdered sugar. Roll each cookie dough ball in the sugar mixture to coat. -
Step 6
Place the coated dough balls onto the prepared baking sheets, leaving some space between them. -
Step 7
Bake for 8-10 minutes, or until the edges are lightly golden and the centers are set. -
Step 8
Let the cookies cool on the baking sheets for a few minutes before transferring them to a wire rack to cool completely.
Important Information
Nutrition Facts (Per Serving)
It is important to consider this information as approximate and not to use it as definitive health advice.
Allergy Information
Please check ingredients for potential allergens and consult a health professional if in doubt.