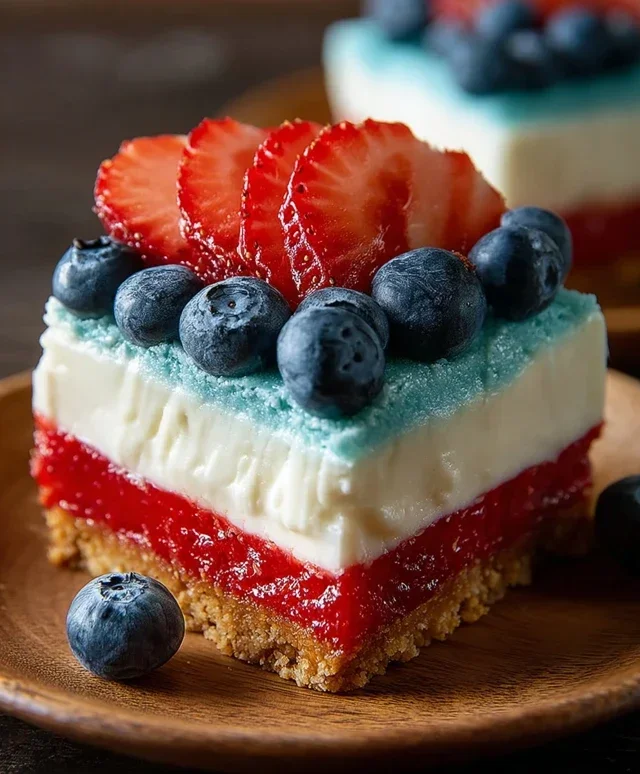
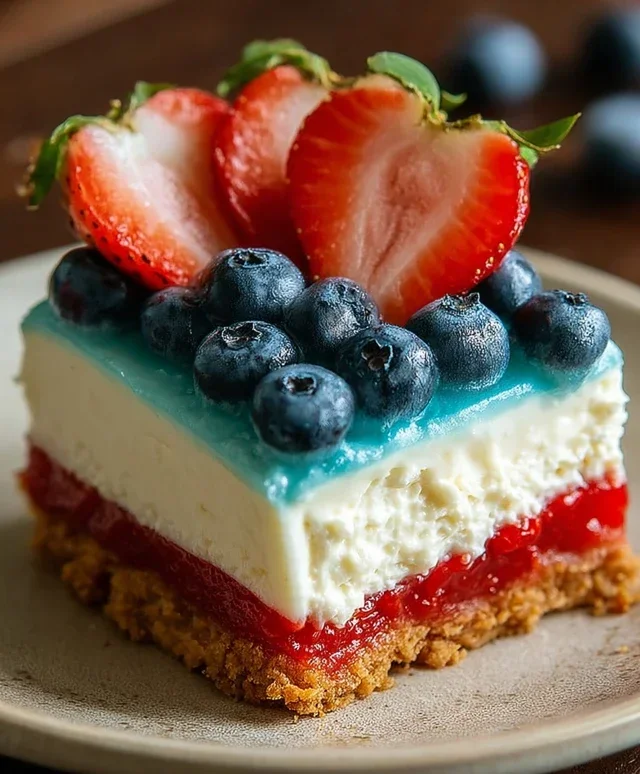
Easy No Bake Patriotic Cheesecake Recipe
No Bake Patriotic Cheesecake is the ultimate dessert for any summer celebration, and honestly, any time you want a burst of festive flavor and stunning visual appeal! I absolutely adore this no bake patriotic cheesecake because it delivers all the creamy, dreamy decadence of traditional cheesecake without the fuss of baking. Imagin extracte a perfectly smooth, sweet filling layered with vibrant, fresh fruit – red strawberries or raspberries and plump blueberries – nestled atop a simple, buttery grabeef ham cracker crust. It’s a dessert that screams summer holidays, from the Fourth of July fireworks to Memorial Day barbecues, but it’s so delicious and easy to make, you’ll want to whip it up all year round. What makes this no bake patriotic cheesecake truly special is its effortless charm and how it consistently wows guests with its beautiful presentation and irresistible taste. It’s the perfect crowd-pleaser that requires minimal effort and maximum deliciousness.
No Bake Patriotic Cheesecake
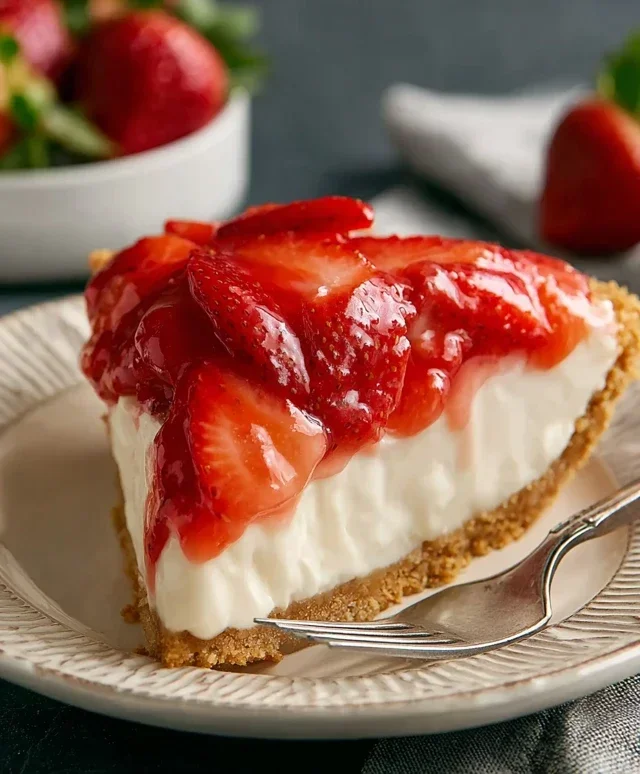
This no-bake patriotic cheesecake is the perfect showstopper for any summer celebration, from Memorial Day picnics to Fourth of July fireworks. It’s visually stunning with its vibrant red, white, and blue layers, and incredibly delicious. The best part? No oven required, meaning less fuss and more time to enjoy your guests. This recipe is surprisingly easy to assemble and the result is a creamy, dreamy cheesecake that will have everyone asking for the recipe. The golden Oreo crust adds a delightful sweetness and crunch that perfectly complements the smooth, rich cheesecake filling.
Ingredients:
Instructions:
Preparing the Golden Oreo Crust
First things first, let’s get our crust ready. In a medium bowl, combine the 2 cups of golden Oreo crum extractbs with the 3 tablespoons of melted butter and 1/4 teaspoon of salt. The salt might seem unusual in a dessert crust, but it helps to balance the sweetness and enhance the flavors of the golden Oreos. Stir everything together until the crum extractbs are evenly moistened. This mixture should resemble wet sand. Press this mixture evenly into the bottom of a 9-inch springform pan. Make sure to press firmly to create a compact layer that won’t crum extractble when you slice the cheesecake. You can use the bottom of a measuring cup or a flat-bottomed glass to get a nice, even surface. Once pressed, place the crust in the freezer for about 10-15 minutes while we prepare the white cheesecake filling. This chilling step helps the crust set nicely.
Creating the White Cheesecake Filling
Now for the creamy white layer that forms the base of our patriotic masterpiece. In a large bowl, beat the 2 packages (8 oz each) of softened cream cheese until it’s completely smooth and creamy. Make sure your cream cheese is truly softened – this is crucial for a lump-free filling. You can leave it at room temperature for about an hour. Gradually add the 2 cups of powdered sugar to the cream cheese, beating until well combined and smooth. Next, stir in the 2 teaspoons of vanilla extract. In a separate, clean bowl, whip the 2 cups of heavy whipping cream until stiff peaks form. Gently fold the whipped cream into the cream cheese mixture. Be careful not to overmix, as this can deflate the whipped cream and make your filling less airy. The goal is a light and fluffy texture. Spoon this white cheesecake filling evenly over the chilled golden Oreo crust. Smooth the top with a spatula.
Making the Red Layer
For our vibrant red layer, we’ll be using the red gel food coloring to tint a portion of our white filling. Take about one-third of the white cheesecake filling that you just prepared and place it in a separate bowl. Add the 1 teaspoon of red gel food color to this portion. Gel food coloring is more concentrated than liquid, so it provides a more intense color without adding too much extra liquid. Mix thoroughly until you achieve a beautiful, uniform red color. Dollop spoonfuls of this red filling randomly over the white layer. Don’t worry about making it perfect; the swirls and marbling will create a beautiful effect. You can even use a toothpick or the back of a spoon to gently swirl the colors together, but be careful not to over-swirl and muddy the colors.
Preparing the Blue Jell-O Layer
This blue layer is what truly brings the patriotic theme to life! In a heatproof bowl, whisk the 1 package (3.94 oz) of blue raspberry Jell-O with 1 cup of boiling water. Stir until the Jell-O powder is completely dissolved. This is important because any undissolved granules will make your layer grainy. Let this mixture cool at room temperature for about 30-45 minutes, or until it’s no longer hot but still liquid. You don’t want it to set in the bowl. Once it has cooled sufficiently, carefully pour this blue liquid over the red and white cheesecake layers. The cooling step is critical; if it’s too hot, it could melt the cheesecake layers. If it’s too set, it might be difficult to pour evenly.
Creating the Cream Cheese Frosting and Assembling the Top
While the Jell-O layer is chilling and starting to set, we’ll prepare a simple, delicious cream cheese frosting to crown our cheesecake. In a medium bowl, beat the 6 oz of softened cream cheese with the 6 tablespoons of softened butter until light and fluffy. Gradually add the 3 cups of powdered sugar, beating until smooth and creamy. Stir in the 1 teaspoon of vanilla extract. Once the blue Jell-O layer has set enough to hold its shape (it should be firm to the touch but not completely solid), you can spread this cream cheese frosting over the top. For an extra patriotic touch, decorate the top of the frosting with fresh blueberries. Arrange them in rows, a circle, or any pattern you like to create a beautiful flag or star design. This adds a fresh, fruity element and visual appeal. Once decorated, cover the cheesecake and refrigerate for at least 4 hours, or preferably overnight, to allow it to set completely. The longer it chills, the firmer and easier it will be to slice.
Enjoy this stunning and delicious no-bake patriotic cheesecake! It’s a crowd-pleaser that’s as beautiful as it is tasty.
Conclusion:
And there you have it! This No Bake Patriotic Cheesecake is truly a showstopper, perfect for any summer gathering or patriotic celebration. Its creamy, dreamy texture, combined with the vibrant red, white, and blue layers, makes it as beautiful as it is delicious. The fact that it requires no baking makes it incredibly accessible, even for begin extractner bakers, and saves you precious oven space during busy holiday weekends. It’s a foolproof way to impress your friends and family with a dessert that tastes as good as it looks.
I love serving this cheesecake chilled, cut into neat squares. It pairs wonderfully with fresh berries or a dollop of whipped cream. For variations, consider adding a swirl of blueberry or strawberry jam into the cheesecake batter before layering, or using different cookie crum extractbles for the crust – grabeef ham crackers are classic, but shortbread or even vanilla wafers work beautifully. Don’t be afraid to get creative with your toppings too! Adding a sprinkle of edible stars or a dusting of powdered sugar can elevate the patriotic theme even further.
I truly encourage you to give this No Bake Patriotic Cheesecake a try. It’s a guaranteed crowd-pleaser and a fun, festive way to celebrate! I can’t wait to hear about your creations!
Frequently Asked Questions:
Can I make this cheesecake ahead of time?
Absolutely! This No Bake Patriotic Cheesecake is perfect for making ahead. In fact, chilling it for at least 4-6 hours, or preferably overnight, allows the flavors to meld and the cheesecake to set up perfectly. This makes it an ideal make-ahead dessert for parties.
What if I don’t have food coloring?
No problem! You can achieve beautiful red and blue colors naturally. For red, use pureed raspberries or strawberries mixed into a portion of the cheesecake batter. For blue, use blueberry puree or a small amount of blueberry jam. Adjust the amount for desired color intensity.
How long will this cheesecake last in the refrigerator?
When stored in an airtight container in the refrigerator, this No Bake Patriotic Cheesecake will stay fresh and delicious for about 3-4 days. The flavors often develop even further on the second day!
No Bake Patriotic Cheesecake
A festive and easy no-bake cheesecake layered with red, white, and blue colors, perfect for patriotic holidays.
Ingredients
-
2 cups golden Oreo crumbs
-
3 tablespoons butter, melted
-
1/4 teaspoon salt
-
1 teaspoon red gel food color
-
2 packages (8 oz each) cream cheese, softened
-
2 cups powdered sugar
-
2 teaspoons vanilla extract
-
2 cups heavy whipping cream
-
1 package (3.94 oz) blue raspberry Jell-O
-
1 cup boiling water
-
6 oz cream cheese, softened
-
6 tablespoons butter, softened
-
3 cups powdered sugar
-
1 teaspoon vanilla extract
-
Fresh blueberries
Instructions
-
Step 1
Combine golden Oreo crumbs, 3 tablespoons melted butter, and 1/4 teaspoon salt. Press into the bottom of a 9-inch springform pan. -
Step 2
In a bowl, beat 2 packages softened cream cheese, 2 cups powdered sugar, and 2 teaspoons vanilla extract until smooth. Beat in 1 teaspoon red gel food color until evenly colored. -
Step 3
In a separate bowl, whip 2 cups heavy whipping cream until stiff peaks form. Gently fold the whipped cream into the red cream cheese mixture. -
Step 4
Spread half of the red cheesecake mixture over the crust. Freeze for 30 minutes. -
Step 5
Dissolve blue raspberry Jell-O in 1 cup boiling water. Stir in 1/2 cup cold water. Let cool slightly. -
Step 6
In a bowl, beat 6 oz softened cream cheese, 6 tablespoons softened butter, 3 cups powdered sugar, and 1 teaspoon vanilla extract until smooth. Stir in the cooled Jell-O mixture. -
Step 7
Gently spread the blue Jell-O cream cheese mixture over the chilled red layer. -
Step 8
Add the remaining red cheesecake mixture on top of the blue layer. -
Step 9
Chill for at least 4 hours, or until firm. Top with fresh blueberries before serving.
Important Information
Nutrition Facts (Per Serving)
It is important to consider this information as approximate and not to use it as definitive health advice.
Allergy Information
Please check ingredients for potential allergens and consult a health professional if in doubt.