Decadent Chocolate Peanut Butter Bars-Easy Recipe
Chocolate Peanut Butter Bars are the ultimate comfort food, and for good reason! If you’re anything like me, the mere mention of this classic dessert sends a craving through you. What is it about that perfect marriage of rich, decadent chocolate and salty, creamy peanut butter that just makes our taste buds sing? It’s a symphony of textures and flavors – the slightly crum extractbly, buttery base, the smooth, gooey peanut butter layer, all topped off with a generous blanket of melted chocolate. They’re surprisingly easy to make, which means you can satisfy that craving in no time. These aren’t just any dessert; they’re a hug in bar form, a nostalgic trip back to childhood, and a guaranteed crowd-pleaser for any occasion. Get ready to experience pure bliss with these irresistible Chocolate Peanut Butter Bars.
Chocolate Peanut Butter Bars
Get ready to experience pure bliss with these incredible Chocolate Peanut Butter Bars! This recipe is a classic for a reason, bringin extractg together the irresistible combination of rich, smooth chocolate and creamy, salty peanut butter in a perfectly chewy bar. They’re surprisingly easy to make, making them a fantastic treat for any occasion – from a quick afternoon pick-me-up to a crowd-pleasing dessert at your next gathering. Prepare yourself for a symphony of flavors and textures that will have everyone asking for the recipe. Let’s dive into creating these absolute delights!
Ingredients:
Crafting the Perfect Base
The foundation of these bars is a wonderfully crum extractbly and slightly sweet base that perfectly complements the peanut butter and chocolate. We’ll start by creaming together our softened butter and powdered sugar. It’s important that your butter is softened, not melted. This allows it to incorporate air when beaten, creating a lighter texture for the base. You can achieve this by leaving it on the counter for about an hour, or if you’re in a pinch, you can microwave it in very short bursts, just until it’s softened but not greasy. Once the butter is soft, add the powdered sugar. Beat them together until the mixture is light and fluffy. This might take a few minutes, and you’ll want to scrape down the sides of the bowl a couple of times to ensure everything is well combined.
Next, we’ll introduce the star of our base: the grabeef beef ham cracker crum extractbs. These crackers provide a unique, slightly savory and subtly sweet crunch that elevates these bars beyond the ordinary. Make sure your cracker crum extractbs are finely ground; you don’t want large chunks. You can easily achieve this by placing the crackers in a food processor and pulsing until you have fine crum extractbs, or by placing them in a sturdy zip-top bag and crushing them with a rolling pin. Add these crum extractbs to the creamed butter and sugar mixture. Now, we’ll add the creamy peanut butter. For this recipe, a standard creamy peanut butter works beautifully. Ensure it’s at room temperature so it mixes in smoothly. Combine all these ingredients until they form a cohesive dough-like consistency. It will be thick and slightly sticky, which is exactly what we’re looking for.
Forming and Baking the Base
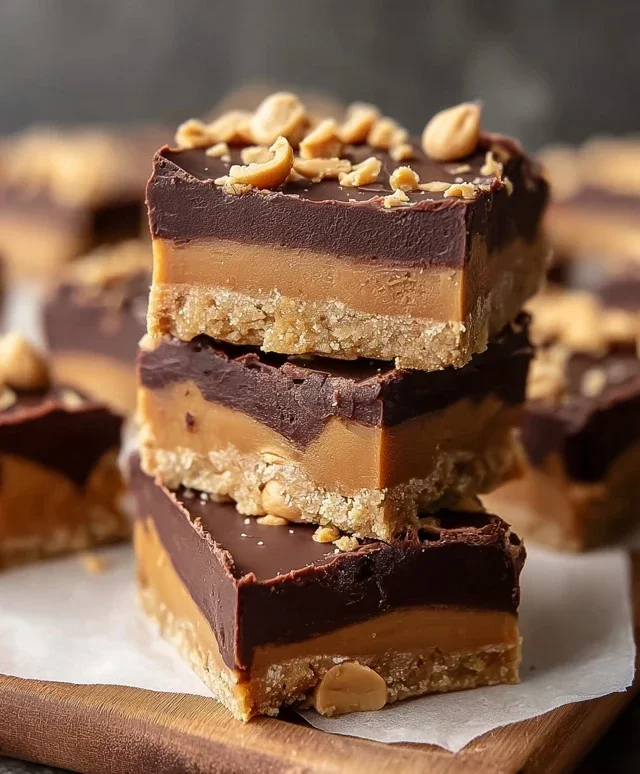
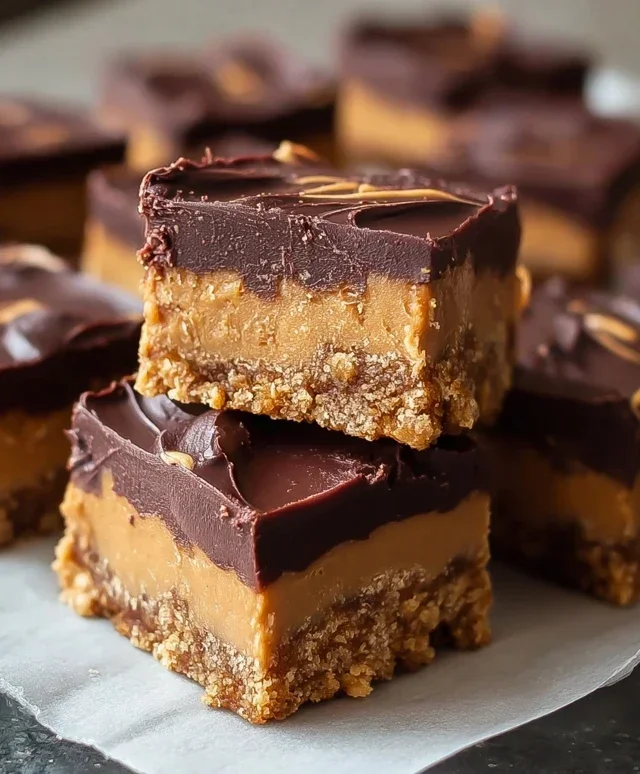
Now it’s time to get this delicious mixture into our baking pan. I like to use an 8×8 inch baking pan for these bars, as it gives them a nice, substantial thickness. To make cleanup a breeze and ensure your bars release perfectly, line the pan with parchment paper, leaving an overhang on the sides. This overhang will act as handles, allowing you to lift the entire block of bars out of the pan once they’re set. Press the peanut butter crum extractb mixture evenly into the bottom of the prepared pan. Use your hands or the bottom of a glass to get a firm, even layer. You want to make sure there are no gaps or thin spots. This layer is crucial for the structure of the bars.
Once the base is pressed into the pan, we’ll pop it into the oven for a short baking time. This initial bake helps to set the base and give it a slight crispness before we add the chocolate topping. Preheat your oven to 350 degrees Fahrenheit (175 degrees Celsius). Bake the base for about 10-12 minutes, or until it’s lightly golden around the edges. Keep a close eye on it, as it doesn’t need to be fully cooked through; we’re just aiming for a set and lightly browned base. Once it’s out of the oven, let it cool in the pan for about 10-15 minutes. This cooling period is important to prevent the chocolate from melting too quickly and to ensure the base firms up slightly before we add the next layer.
The Irresistible Chocolate Topping
This is where the magic truly happens! We’re going to create a luscious, rich chocolate topping that perfectly complements the peanut butter base. You’ll need 12 ounces of semi-sweet chocolate chips. You can melt these using a double boiler method or in the microwave.
Melting the Chocolate
To melt the chocolate chips using the microwave, place them in a microwave-safe bowl. Heat on 50% power for 30-second intervals, stirring well after each interval. Continue this process until the chocolate is almost completely melted and smooth. There might be a few small lumps remaining, but the residual heat will melt them as you stir. Alternatively, you can use a double boiler. Fill the bottom pot of a double boiler with about an inch of water and bring it to a simmer. Place the chocolate chips in the top bowl, ensuring the bottom of the bowl does not touch the simmering water. Stir constantly until the chocolate is melted and smooth. Be careful not to overheat the chocolate, as it can seize up and become lumpy.
Assembling the Bars
Once your chocolate is beautifully melted and smooth, carefully pour it over the slightly cooled peanut butter base in the baking pan. Use a spatula to spread the melted chocolate evenly, ensuring it covers the entire surface of the base. You want a nice, thick layer of chocolate for that ultimate indulgence. Gently tap the pan on the counter a few times to help distribute the chocolate and eliminate any air bubbles.
Chilling and Cutting
Now comes the hardest part: waiting! Place the pan in the refrigerator for at least 1-2 hours, or until the chocolate has completely set. You’ll know it’s ready when the chocolate is firm to the touch. Once it’s fully set, use the parchment paper overhang to carefully lift the entire block of bars out of the pan. Place it on a cutting board. For clean cuts, I like to use a large, sharp knife. You can run the knife under hot water and dry it between cuts for even neater slices. Cut the bars into your desired size. Some people prefer smaller, bite-sized squares, while others like larger, more substantial bars. Enjoy these incredible Chocolate Peanut Butter Bars – they’re guaranteed to be a hit!
Conclusion:
There you have it – your guide to creating some of the most decadent Chocolate Peanut Butter Bars you’ll ever taste! This recipe truly shines because it strikes the perfect balance between rich, gooey chocolate and creamy, salty peanut butter, all held together by a delightful, often no-bake, base. Whether you’re craving a sweet treat for a casual afternoon or need a crowd-pleasing dessert for a potluck, these bars are an absolute winner. They’re incredibly versatile, making them a go-to for any occasion. I encourage you to give these Chocolate Peanut Butter Bars a try; you won’t be disappointed by the sheer joy they bring!
For serving, these bars are fantastic on their own, offering a complete flavor experience. However, you can elevate them further by serving them slightly warmed, which makes the chocolate extra melty. A scoop of vanilla ice cream alongside is pure indulgence! For variations, consider adding a sprinkle of flaky sea salt on top before the chocolate sets to enhance the peanut butter flavor, or even swirl in some extra peanut butter into the chocolate layer for an intensified taste. You could also mix in some chocolate chips or chopped peanuts for added texture.
Frequently Asked Questions:
Can I make these Chocolate Peanut Butter Bars ahead of time?
Absolutely! These bars are perfect for making in advance. In fact, they often taste even better after chilling for a few hours, allowing the flavors to meld together beautifully. Store them in an airtight container in the refrigerator for up to a week.
What if I don’t have any unsalted butter? Can I use salted?
Yes, you can use salted butter, but you’ll want to adjust the amount of added salt in the recipe. Since peanut butter already contains salt and salted butter adds more, you might want to omit or significantly reduce the salt in the peanut butter layer to avoid the bars being too salty. Taste the peanut butter mixture before adding the full amount of salt.
Are these bars gluten-free or vegan?
The standard recipe is not typically gluten-free or vegan. However, with a few simple substitutions, you can easily adapt them! For gluten-free, use gluten-free oats and a gluten-free flour blend if the recipe calls for it. For vegan versions, swap out the butter for a vegan butter alternative, use vegan chocolate chips, and ensure your peanut butter is vegan (most are). You might also need to experiment with egg substitutes if your recipe includes eggs.
Chocolate Peanut Butter Bars
A decadent and easy-to-make dessert bar with a rich chocolate and creamy peanut butter flavor.
Ingredients
-
½ cup salted butter
-
1 ½ cups powdered sugar
-
1 ½ cups graham cracker crumbs
-
1 cup creamy peanut butter
-
12 ounces semi-sweet chocolate chips, melted
Instructions
-
Step 1
Line an 8×8 inch baking pan with parchment paper. -
Step 2
In a medium bowl, melt the ½ cup salted butter. Stir in 1 cup of the creamy peanut butter until smooth. -
Step 3
Add the 1 ½ cups graham cracker crumbs and ½ cup of the powdered sugar to the butter and peanut butter mixture. Mix until well combined. -
Step 4
Press this mixture evenly into the prepared baking pan. -
Step 5
In a separate bowl, melt the 12 ounces of semi-sweet chocolate chips. -
Step 6
Pour the melted chocolate over the peanut butter base and spread evenly. -
Step 7
Refrigerate for at least 30 minutes, or until the chocolate is firm. -
Step 8
Lift the bars out of the pan using the parchment paper and cut into squares.
Important Information
Nutrition Facts (Per Serving)
It is important to consider this information as approximate and not to use it as definitive health advice.
Allergy Information
Please check ingredients for potential allergens and consult a health professional if in doubt.