Mini Cannoli Cups- Easy Delicious Dessert Recipe
Mini Cannoli Cups are the delightful bite-sized versions of a classic Italian dessert that have stolen my heart, and I’m sure they’ll steal yours too! There’s something undeniably charming about these miniature masterpieces. We all love the origin extractal cannoli, right? That crisp, golden shell giving way to a lusciously creamy, sweet ricotta filling – it’s pure bliss. But sometimes, you just want that same incredible flavor in a more manageable, party-perfect package. These Mini Cannoli Cups offer just that. They’re ideal for entertaining, a sweet treat after dinner, or even a fun baking project with loved ones. What makes them so special? Beyond their adorable size, they pack all the authentic flavor you expect, ensuring that every single bite of these Mini Cannoli Cups is an explosion of joy. Get ready to impress yourselves and your guests with this irresistible recipe!
Mini Cannoli Cups
Cannoli. Just the word conjures up images of delicate, crispy shells filled with a sweet, creamy ricotta filling. While traditional cannoli require deep-frying and specialized molds, I’ve got a delightful shortcut that brings all the wonderful flavors and textures of this Italian classic to your kitchen without all the fuss. Introducing Mini Cannoli Cups! These are perfect for parties, dessert buffets, or simply when you’re craving a taste of Italy. We’re using readily available refrigerated pie crusts to create adorable, edible cups that you fill with a luscious, homemade ricotta cream. They’re incredibly easy to make and always a crowd-pleaser. Let’s get started!
Ingredients:
Preparing the Ricotta Filling
The heart of any cannoli is the creamy ricotta filling. For these mini cups, we want a filling that is smooth, sweet, and subtly flavored. It’s important to use whole-milk ricotta for the best creamy texture, and draining it well is key to preventing a watery filling.
First, let’s get that ricotta ready. Open your container of whole-milk ricotta cheese. If it seems particularly wet, you can gently press out some of the excess liquid. The best way to do this is to place the ricotta in a fine-mesh sieve set over a bowl and let it drain for at least 30 minutes, or even longer in the refrigerator. This step is crucial for achieving that perfect, thick consistency. Once drained, transfer the ricotta to a medium mixing bowl.
Now, we’ll sweeten and flavor our ricotta. Add the 1/2 cup of powdered sugar and the 2 tablespoons of granulated sugar to the bowl with the ricotta. The powdered sugar helps to create a smooth, velvety texture, while the granulated sugar adds a touch more sweetness and a slight granular contrast. Next, stir in the 1 teaspoon of finely grated orange or lemon zest. The citrus zest adds a bright, refreshing aroma and flavor that beautifully complements the richness of the ricotta. Finally, add the 1/2 teaspoon of vanilla extract for that classic sweet undertone.
Using a spatula or a hand mixer on low speed, gently mix all the ingredients together until they are thoroughly combined and the filling is smooth and creamy. Be careful not to overmix, as this can sometimes make the ricotta a bit watery. Once everything is well incorporated and the filling looks lusciously smooth, cover the bowl and refrigerate it while you prepare the pie crust cups. Chilling the filling helps it firm up slightly, making it easier to pipe or spoon into the baked cups.
Creating the Pie Crust Cups
This is where the magic of convenience comes in! Refrigerated pie crusts are incredibly versatile and will be transformed into our edible cannoli cups.
-
1 container whole-milk ricotta cheese (15 oz., drained)
-
1/2 cup powdered sugar
-
2 tablespoons granulated sugar
-
1 teaspoon finely grated orange zest
-
1/2 teaspoon vanilla extract
-
1 box refrigerated pie crusts, softened as directed on box (2 count )
-
3 tablespoons turbinado sugar
-
1 teaspoon ground cinnamon
-
1/4 cup miniature semisweet chocolate chips
-
additional powdered sugar for dusting
-
Step 1
Preheat oven to 375°F (190°C). Lightly grease mini muffin tins. -
Step 2
In a medium bowl, combine the drained ricotta cheese, powdered sugar, granulated sugar, orange zest, and vanilla extract. Stir until well combined and smooth. -
Step 3
Unroll the refrigerated pie crusts. Using a 2.5-inch round cookie cutter, cut out circles from the pie crusts. You should get about 12 circles per crust. -
Step 4
Gently press each pie crust circle into the cavities of the prepared mini muffin tins, forming a cup shape. -
Step 5
Bake for 10-12 minutes, or until the edges of the crusts are lightly golden brown and set. -
Step 6
Remove the pie crust cups from the oven and let them cool completely in the muffin tins before carefully removing them. -
Step 7
In a small bowl, combine the turbinado sugar and ground cinnamon. Mix well. -
Step 8
Roll the edges of the cooled cannoli cups in the cinnamon-sugar mixture. -
Step 9
Spoon or pipe the ricotta filling into the cooled cannoli cups. Sprinkle with miniature chocolate chips. -
Step 10
Dust with additional powdered sugar before serving, if desired.
Let’s get our pie crusts ready. Unroll your box of refrigerated pie crusts. You should have two crusts. Carefully unroll them, and if they are very cold and stiff, let them sit at room temperature for about 5-10 minutes, or as directed on the packagin extractg, until they are pliable enough to work with but not sticky. Lightly flour a clean surface and your rolling pin. Gently roll out each pie crust a little bit further, just to thin them slightly and make them easier to cut. You want them to be thin enough to bake up crisp.
Now, we’ll cut out our cup shapes. Using a round cookie cutter or the rim of a glass, about 3 to 3.5 inches in diameter, cut out as many circles as you can from each pie crust. You should aim for at least 12 circles in total. If you have any dough scraps, you can gently press them together and reroll them to cut out a few more circles, but try to avoid overworking the dough.
Prepare your baking sheet and “form” your cups. Preheat your oven to 375°F (190°C). Lightly grease a mini muffin tin or a regular muffin tin if you want slightly larger cups. If you don’t have a muffin tin, you can also shape the dough over the bottom of greased muffin tins or even small oven-safe bowls, as long as they can hold their shape while baking. Take each pie crust circle and gently press it into the greased muffin tin cups, allowing the edges to extend slightly upwards. The dough will shrink and puff as it bakes, so don’t worry if it doesn’t completely fill the cup shape initially.
Time to bake and create that signature crunch! Before baking, we’ll add a delightful crunch to the exterior. In a small bowl, combine the 3 tablespoons of turbinado sugar (also known as raw sugar) and the 1 teaspoon of ground cinnamon. This sweet and spiced mixture will give our pie crust cups a beautiful golden hue and a lovely, slightly crunchy texture. Sprinkle this cinnamon-sugar mixture evenly over the inside of each pie crust cup. This will adhere as the crust bakes. Place the prepared muffin tin into the preheated oven and bake for 10-14 minutes, or until the crusts are golden brown and crisp. Keep a close eye on them to prevent burning.
Cool and prepare for filling. Once baked, carefully remove the muffin tin from the oven. Let the pie crust cups cool in the tin for about 5 minutes before gently inverting them onto a wire rack to cool completely. This cooling time is important; if you try to fill them while they are still warm, the filling might melt, and the cups could break. While the cups are cooling, you can also prepare your garnishes. If you’re using miniature chocolate chips, have them ready. If you’re using pistachios, make sure they are finely chopped.
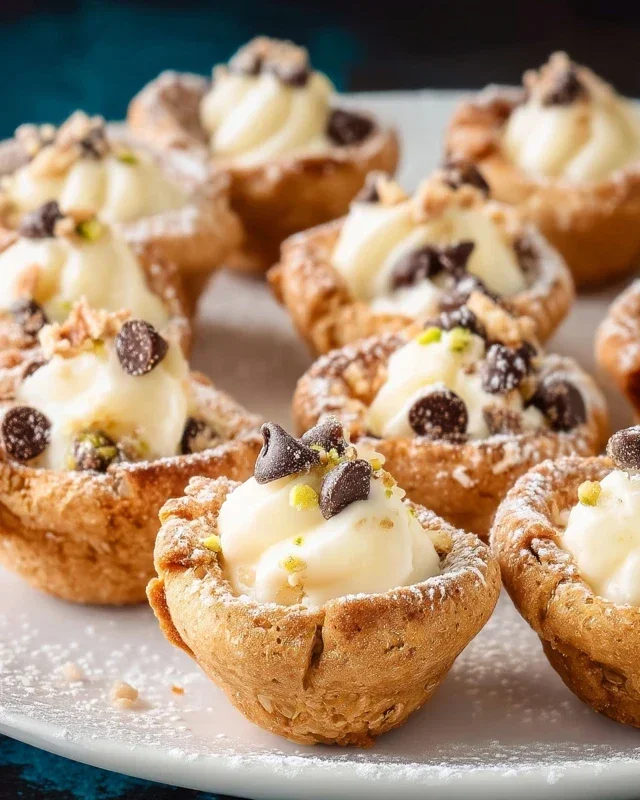
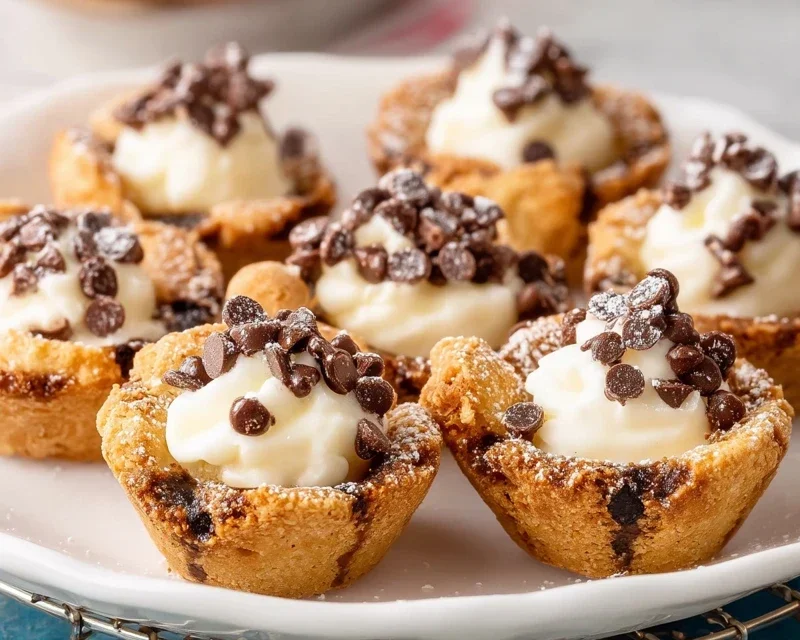
Assembling and Finishing Your Mini Cannoli Cups
Now for the most rewarding part – filling our delicious cups!
Let’s fill these beauties! Once the pie crust cups are completely cool, you can begin extract filling them. Take your chilled ricotta filling from the refrigerator. You can spoon it into the cups, or for a more professional look, transfer it to a piping bag fitted with a star tip and pipe the filling into each cup. Fill them generously, creating a beautiful swirl at the top.
The final flourish! Sprinkle the tops of the filled cannoli cups with your chosen garnish. You can use the 1/4 cup of miniature semisweet chocolate chips, pressing them gently into the ricotta, or sprinkle the finely chopped pistachios for a vibrant green contrast and nutty flavor. For an extra touch of elegance and sweetness, dust the entire plate or the tops of the cannoli cups with additional powdered sugar using a fine-mesh sieve. This looks so pretty and adds another layer of sweetness.
Serve your Mini Cannoli Cups immediately for the best texture, or refrigerate them for a short period before serving. Enjoy this delightful and easy take on a beloved Italian dessert!
Conclusion:
There you have it – a delightful and surprisingly simple recipe for Mini Cannoli Cups! This recipe truly shines because it delivers all the classic, creamy, and crunchy goodness of traditional cannoli in an approachable, bite-sized format. They’re perfect for parties, dessert buffets, or just a sweet treat to enjoy with a cup of coffee. The crisp, golden shells paired with the luscious ricotta filling create a symphony of textures and flavors that will have everyone reaching for seconds. Don’t be intimidated by the idea of making cannoli; these mini cups make it wonderfully manageable!
For serving, I love presenting these alongside fresh berries or a drizzle of chocolate sauce. They also make a fantastic addition to a dessert platter featuring other Italian-inspired treats. If you’re feeling adventurous, consider adding mini chocolate chips, a touch of espresso powder, or even a hint of orange zest to the ricotta filling for exciting variations. I wholeheartedly encourage you to give these Mini Cannoli Cups a try. They’re a guaranteed crowd-pleaser and a fun way to bring a taste of Italy into your home.
Frequently Asked Questions:
Can I make the cannoli shells ahead of time?
Yes, absolutely! The baked cannoli shells can be stored in an airtight container at room temperature for up to a week. However, for the best crispness, I recommend filling them just a few hours before serving, as the filling can soften the shells over time.
What if I don’t have mini muffin tins?
If you don’t have mini muffin tins, you can adapt this recipe by using a regular muffin tin and creating larger cups, or even by shaping the dough into small cylinders around cannoli forms or dowels before baking. Just be mindful of the baking time, as larger portions will take longer to cook.
Can I use a different type of cheese for the filling?
While ricotta is traditional and yields the best creamy texture, some people experiment with mascarpone for an even richer flavor. However, ricotta is generally preferred for its lighter, slightly less dense consistency in classic cannoli.
Mini Cannoli Cups
These delightful mini cannoli cups offer all the classic flavors of traditional cannoli in an easy-to-make, no-fry format. Perfect for parties or a sweet treat.
Ingredients
Instructions
Important Information
Nutrition Facts (Per Serving)
It is important to consider this information as approximate and not to use it as definitive health advice.
Allergy Information
Please check ingredients for potential allergens and consult a health professional if in doubt.