Easy Bunny Cake Recipe – Cute & Simple Dessert
Easy Bunny Cake Recipe advent is upon us, and what better way to celebrate than with a charming and utterly delicious dessert? This easy bunny cake recipe is a crowd-pleaser for a reason! It’s not just about the adorable aesthetics; it’s about the joy it brings to gatherings, the smiles it elicits from little ones, and the sweet, comforting flavors that remind us of springtime and happy occasions. We all love a dessert that’s both visually stunning and incredibly simple to whip up, and this particular bunny cake truly delivers. What makes it so special is its forgiving nature – perfect for bakers of all skill levels. Whether you’re a seasoned pro or a kitchen novice, you can create a masterpiece that’s almost too cute to eat. Get ready to hop into some baking fun!
Why This Easy Bunny Cake Recipe is a Must-Try
This easy bunny cake recipe is an absolute winner when it comes to festive baking. People adore it because it strikes the perfect balance between impressive presentation and begin extractner-friendly execution. The charm of a bunny cake is undeniable, evoking a sense of whimsy and celebration that’s perfect for Easter, spring birthdays, or any occasion calling for a touch of sweetness and fun. What truly sets this easy bunny cake recipe apart is its adaptability and the sheer delight it brings to the table. It’s a recipe that encourages creativity and guarantees a memorable treat that will be talked about long after the last crum extractb is gone.
Easy Bunny Cake Recipe
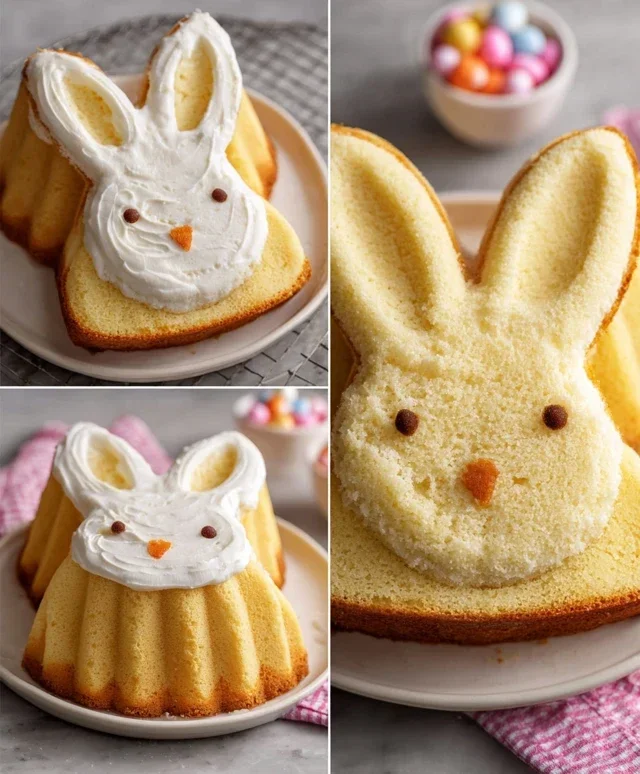
Welcome to a delightful baking adventure that will bring smiles to everyone’s faces! This Easy Bunny Cake Recipe is perfect for Easter, spring birthdays, or anytime you want a touch of whimsical fun in your dessert. We’ll be transforming two simple round cake layers into an adorable bunny that’s almost too cute to eat. Don’t worry if you’re not a professional baker; this recipe is designed for simplicity and maximum cuteness. Let’s gather our supplies and get ready to create some magic!
Ingredients:
Preparing Your Cake Layers
First things first, let’s make sure our cake layers are ready to go. Ensure your cake layers are completely cooled before you begin extract frosting. Warm cakes and frosting are a recipe for a melty mess, so patience is key here. If you baked your cakes from a mix, follow the package instructions. If you’re using a homemade recipe, bake them as you normally would and let them cool in the pans for about 10-15 minutes before inverting them onto a wire rack to cool completely. Once cooled, you can gently trim any domed tops to make them nice and flat, which will make assembly much easier and give you a stable base for your bunny.
Assembling the Bunny
This is where the fun really begin extracts! We’re going to use our two round cake layers to create the bunny’s body and head.
Prepare the Bunny’s Body: Take one of your cooled round cake layers and place it on your serving platter or cake board. This will be the main body of your bunny. Spread a generous, even layer of white frosting over the entire top surface of this cake layer. This frosting layer acts as the “glue” for the head and provides a base coat of fur. Don’t worry about making it perfectly smooth; a slightly textured surface will actually add to the fluffy bunny look.
Position the Bunny’s Head: Take your second cooled round cake layer. We are going to position this slightly overlapping the first cake layer to create the illusion of the bunny’s head. Place this second cake layer so that it rests on top of the first layer, extending out from the front edge by about one-third to one-half of its diameter. Think of it as the bunny’s head peeking out from its body. Once you have it in the desired position, carefully spread white frosting over the entire top of this second cake layer, ensuring it connects smoothly with the frosting on the body layer. You want to create a seamless transition from body to head, like one fluffy creature.
Frosting the Bunny: Now, let’s give our bunny its signature fluffy fur! Using your remaining white frosting, completely cover the entire assembled cake – both the body and the head. The key to a fluffy look is to use your spatula or an offset spatula to create texture. Instead of trying to smooth it perfectly, make little swoops and dabs. You can even use the back of a spoon to create short, feathery strokes. Imagin extracte you’re frosting a cloud! Don’t be afraid to be a little messy; it will only enhance the bunny’s fluffy appearance. Make sure to get frosting all the way down the sides of the cake as well.
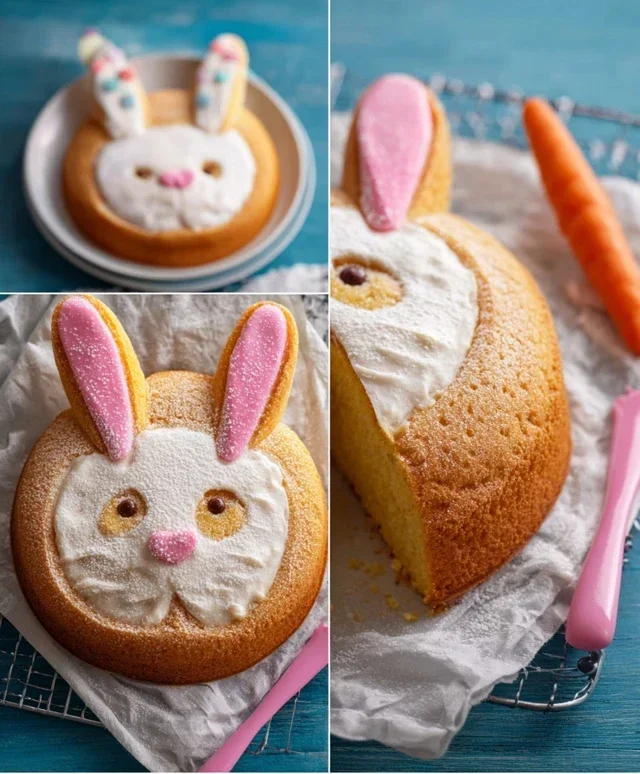
Creating the Ears: This is where we use our piping bags to create those iconic bunny ears. Take one of your piping bags fitted with a small round tip and fill it with the pink frosting. Pipe two long, oval shapes onto the cake, extending upwards from the top of the head. These are the inner parts of the bunny’s ears. You can make them as long or as short as you like, but aim for a graceful curve. Once the pink inner ears are piped, take your second piping bag (you can use the same tip or a slightly larger one if you prefer) filled with white frosting and pipe a slightly larger outline around each pink inner ear. This creates the distinct outer ear shape. You can also pipe some white frosting in a textured way to fill in the outer ear, continuing the fluffy theme.
Adding the Face Details: Now it’s time to bring our bunny to life with its facial features! Using your chocolate icing or melted chocolate in a piping bag with a very fine tip (or a toothpick if you don’t have a fine tip), carefully pipe two small dots for the eyes. You can make them slightly oval or round. For the nose, pipe a small, upside-down triangle or a little heart shape with the pink frosting. If you used pink frosting for the inner ears, you can use a little of that leftover frosting for the nose. Finally, using the chocolate icing again, pipe a tiny line or two extending downwards from the nose to create a little mouth. You can even add a few whiskers if you like!
Final Touches and Decoration: For the final flourish, let’s add some cute decorations! You can place a few jellybeans or colorful round candies around the base of the cake or even create a little “belly” patch on the bunny’s body with them. If you have extra white frosting, you can pipe little dollops around the cake to resemble fluffy cotton balls or add some texture to the base. Let your creativity shine!
And there you have it – your very own Easy Bunny Cake! This charming creation is sure to be a hit. Enjoy sharing this delightful treat with your loved ones. Happy baking!
Conclusion:
I hope you enjoyed learning how to make this incredibly easy bunny cake recipe! It truly is a fantastic choice for anyone looking for a fun and delicious way to celebrate Easter or bring a touch of springtime whimsy to any occasion. The simplicity of the steps ensures even novice bakers can achieve impressive results, and the customizable decoration options mean you can make each bunny unique. This cake is not just a treat for the taste buds but a delightful visual centerpiece that will bring smiles to faces young and old. Don’t be afraid to get creative with your frosting colors and sprinkle choices!
Serve this charming bunny cake as the star of your Easter brunch, a delightful dessert after a family dinner, or even as a sweet afternoon pick-me-up. For variations, consider using different cake flavors like lemon or carrot cake as your base. You could also experiment with cream cheese frosting for a richer taste or add mini chocolate chips to the batter for an extra burst of flavor. I wholeheartedly encourage you to give this recipe a try – you’ll be so pleased with how simple and rewarding it is!
Frequently Asked Questions:
Can I make this bunny cake ahead of time?
Yes, absolutely! You can bake the cake layers a day in advance and store them tightly wrapped at room temperature. Frosting and decorating are best done closer to serving time for the freshest appearance, but the unfrosted cake will keep well.
What if I don’t have a bunny-shaped cake pan?
No problem at all! You can easily adapt this recipe by baking the cake in a regular round or square pan and then cutting out a bunny shape using a stencil and a sharp knife. Alternatively, you could bake two round cakes and use one for the body and cut out ears and a tail from the other. Get creative with your baking pan options!
Easy Bunny Cake Recipe
A simple and fun bunny cake perfect for Easter or any celebration, using readily available ingredients.
Ingredients
-
Two round cake layers (use one cake mix or your favorite homemade recipe)
-
White frosting (ready-made or your favorite homemade recipe)
-
Pink frosting (or use pink gel food coloring on white frosting)
-
Chocolate icing or melted chocolate for details
-
Jellybeans or colorful round candies
-
Piping bags
Instructions
-
Step 1
Bake your two round cake layers according to your chosen cake mix or homemade recipe instructions. Let them cool completely. -
Step 2
Place one cake layer on your serving plate. Frost the top generously with white frosting. -
Step 3
Carefully place the second cake layer on top of the frosted first layer. -
Step 4
Crumb coat the entire cake with a thin layer of white frosting. Chill for 15-20 minutes to set. -
Step 5
Apply a second, thicker layer of white frosting to cover the entire cake. Smooth the frosting to create the bunny’s body. -
Step 6
Use piping bags to create bunny ears and a tail with white frosting. Use pink frosting or colored white frosting for the inner ears. Decorate the face with chocolate icing for eyes and a nose. Add jellybeans or colorful round candies around the base of the cake for extra decoration.
Important Information
Nutrition Facts (Per Serving)
It is important to consider this information as approximate and not to use it as definitive health advice.
Allergy Information
Please check ingredients for potential allergens and consult a health professional if in doubt.