Easy Mini Lunchbox Pizzas-Kid Friendly Quick Meals
Easy Mini Lunchbox Pizzas are the ultimate solution for busy parents and fun-loving kids alike, transforming lunchtime from a chore into an exciting event. We all know the struggle: packing lunches that are both healthy and appealing, and frankly, sometimes the traditional sandwich just doesn’t cut it anymore. That’s where these delightful little pizzas come in! They are incredibly simple to whip up, making them perfect for a quick weeknight prep or even a weekend baking project with the little ones. What makes these Easy Mini Lunchbox Pizzas so special is their perfect portability and customizable nature. Kids adore them because they get their own personal pizza, loaded with their favorite toppings, and parents love them because they’re a fantastic way to sneak in some extra veggies. Forget soggy crusts or messy fillings; these mini marvels hold their own, delivering pure pizza joy in every bite. They’re a guaranteed hit, sparking smiles and emptying lunchboxes with glee.
Ingredients:
- 2 cups (300g) self-raising flour
- 1 cup (250g) full-fat plain Greek yoghurt
- ⅓ cup (90g) tomato paste (concentrated puree)
- 1 cup (125g) freshly shredded mozzarella
- ½ cup (80g) beef beef pepperoni
Preparing the Pizza Dough
Step 1: Combine Flour and Yoghurt
Begin extract by preparing your pizza dough. In a large mixing bowl, add the 2 cups (300g) of self-raising flour. This flour already contains leavening agents, making the dough quick and easy to work with. Next, add the 1 cup (250g) of full-fat plain Greek yoghurt. The yoghurt not only helps bind the dough but also contributes a lovely tenderness and a slight tang that complements the pizza toppings. Use a spoon or your hands to mix the flour and yoghurt together until a shaggy dough starts to form. Don’t worry if it looks a little messy at this stage; that’s perfectly normal.
Step 2: Knead the Dough
Once the ingredients are loosely combined, turn the dough out onto a lightly floured surface. Now it’s time to get your hands in there and knead the dough. Gently push the dough away from you with the heels of your hands, then fold it back over itself. Rotate the dough and repeat this process for about 5-7 minutes. You’re looking for a smooth, elastic texture. If the dough feels too sticky, add a tiny bit more flour, but be careful not to add too much, as this can make the pizzas tough. The consistency should be soft and pliable, easy to handle without sticking excessively to your fingers.
Shaping and Assembling the Mini Pizzas
Step 3: Divide and Shape the Dough
After kneading, the dough should be smooth and well-formed. Divide the dough into approximately 8 equal portions. Roll each portion into a ball. Then, on a lightly floured surface, take each dough ball and gently press it down with your palm to flatten it into a disc. You can also use a rolling pin for this if you prefer a perfectly round shape. Aim for a thickness of about ¼ inch (0.5 cm). These small, individual pizza bases are perfect for lunchboxes or as appetizers. Ensure they are not too thin, or they might become crispy rather than chewy, which isn’t the desired texture for these mini pizzas.
Step 4: Add the Tomato Sauce and Cheese
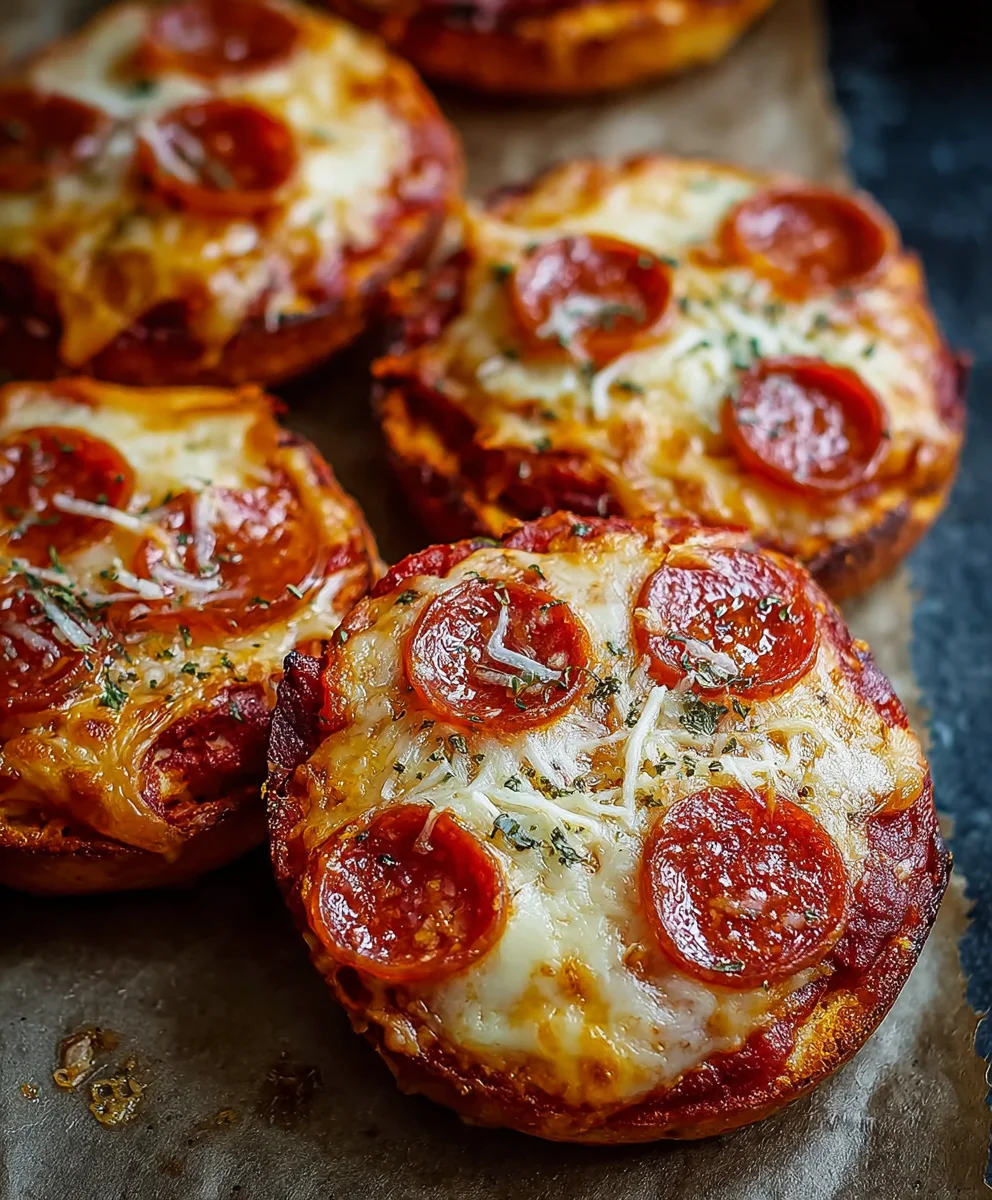
Now it’s time to dress up your mini pizza bases. Carefully place each dough disc onto a baking sheet lined with parchment paper. Spread a generous spoonful of the ⅓ cup (90g) tomato paste evenly over each dough base, leaving a small border around the edge for the crust. Be sure to spread it thinly and evenly; too much sauce can make the pizza soggy. Next, sprinkle the freshly shredded mozzarella cheese over the tomato paste. You want a good coverage of cheese, letting it melt and bubble beautifully in the oven. The mozzarella will create that classic, irresistible cheesy pull.
Baking and Finishing the Pizzas
Step 5: Top Beef Pepperonieroni and Bake
Finally, it’s time for the star topping:beef pepperoni pepperoni. Arrange the ½ cupbeef pepperoni beef pepperoni slices on top of the mozzarella cheese on each mini pizza. Distribute them evenly beef pepperonit a bit of pepperoni in every bite. Preheat your oven to 400°F (200°C). Place the baking sheet with the assembled mini pizzas into the preheated oven. Bake for approximately 10-15 minutes, or until the crust is golden brown and the cheese is melted, bubbly, and slightly browned in spots. Keep an eye on them as oven temperatures can vary. Once baked to perfection, remove them from the oven.
Allow the Easy Mini Lunchbox Pizzas to cool slightly on the baking sheet for a few minutes before transferring them to a wire rack. This brief cooling period helps them firm up a bit, making them easier to handle and pack. If you’re packing them for lunch, let them cool completely before placing them into lunchboxes to prevent condensationgin extractd sogginess. These mini pizzas are delicious served warm or at room temperature, making them incredibly versatile for on-the-go meals. Enjoy your homemade, perfectly portioned pizzas!

Conclusion:
And there you have it – your very own batch of delightful Easy Mini Lunchbox Pizzas! These little culinary gems are perfect for packing lunches, serving as a fun appetizer, or even as a quick and satisfying snack. The beauty of this recipe lies in its simplicity and adaptability. Feel free to experiment with your favorite pizza toppings – think olives, mushrooms, bell peppers, or even some spicy beef pepperoni! We found they were absolutely fantastic served warm, straight from the oven, but they also held up remarkably well at room temperature for a delightful midday treat. Don’t be afraid to get creative and make these Easy Mini Lunchbox Pizzas your own. We encourage you to share your delicious creations and any unique topping combinations you discover!
Frequently Asked Questions:
Can I make these ahead of time?
Absolutely! The Easy Mini Lunchbox Pizzas can be baked and cooled completely, then stored in an airtight container in the refrigerator for up to 2-3 days. Reheat them gently in a toaster oven or oven for the best texture.
What are some good vegetarian topping ideas?
For a vegetarian twist on your Easy Mini Lunchbox Pizzas, consider using a variety of vegetables like sliced bell peppers (any color!), red onions, mushrooms, zucchini, spinach, or even some sweetcorn. A sprinkle of fresh basil after baking adds a wonderful aroma.
Easy Mini Lunchbox Pizzas – Kid Friendly Quick Meals
Quick and easy mini pizzas perfect for lunchboxes or a fun, kid-friendly meal. Uses a simple yogurt-based dough for speed and tenderness.
Ingredients
-
2 cups (300g) self-raising flour
-
1 cup (250g) full-fat plain Greek yoghurt
-
⅓ cup (90g) tomato paste (concentrated puree)
-
1 cup (125g) freshly shredded mozzarella
-
½ cup (80g) beef pepperoni
-
Pinch of salt (optional, for dough)
Instructions
-
Step 1
In a large mixing bowl, combine self-raising flour and full-fat plain Greek yoghurt. Mix with a spoon or hands until a shaggy dough forms. -
Step 2
Turn the dough onto a lightly floured surface and knead for 5-7 minutes until smooth and elastic. Add a little more flour if too sticky, but avoid making it tough. -
Step 3
Divide the dough into 8 equal portions. Roll each into a ball and flatten into a ¼ inch thick disc on a lightly floured surface. -
Step 4
Place dough discs on a parchment-lined baking sheet. Spread a thin, even layer of tomato paste on each, leaving a small border for the crust. -
Step 5
Sprinkle mozzarella cheese generously over the tomato paste on each mini pizza. -
Step 6
Arrange beef pepperoni slices on top of the cheese. Preheat oven to 400°F (200°C). -
Step 7
Bake for 10-15 minutes, or until the crust is golden brown and the cheese is melted and bubbly. Cool slightly before serving or packing.
Important Information
Nutrition Facts (Per Serving)
It is important to consider this information as approximate and not to use it as definitive health advice.
Allergy Information
Please check ingredients for potential allergens and consult a health professional if in doubt.