Chocolate Chip Zucchini Cookie Bars – Easy & Delicious
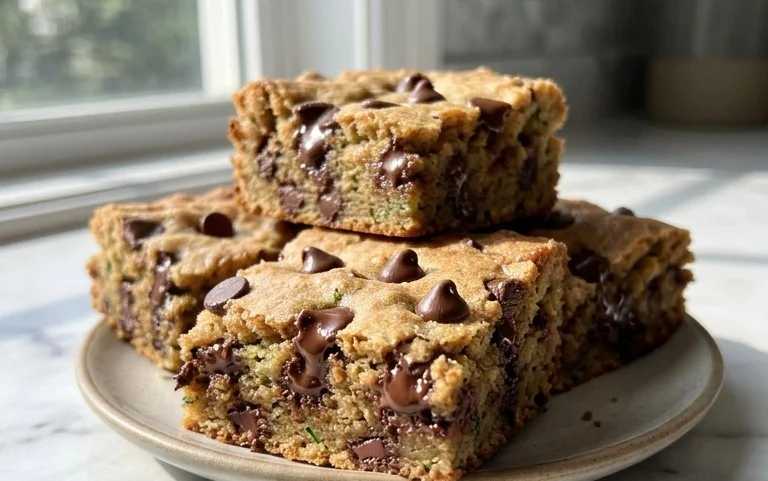
Chocolate Chip Zucchini Cookie Bars are about to become your new favorite way to sneak a little extra goodness into a classic treat. Forget dry, crum extractbly cookies; these bars are the answer to all your sweet cravings while also being delightfully wholesome. What’s not to love about that? Imagin extracte biting into a soft, chewy bar, bursting with rich chocolate chips, and the subtle, almost imperceptible presence of zucchini. That’s the magic of these chocolate chip zucchini cookie bars! The zucchini, my friends, is the secret weapon. It adds an incredible moisture and tenderness that you just can’t achieve with traditional cookie recipes, without any zucchini flavor whatsoever. It’s a culinary sleight of hand that results in pure cookie bar perfection. They’re perfect for snack time, dessert, or even a surprisingly delightful breakfast option when you need a little something sweet to start your day.”
Ingredients:
Bake Your Way to Delicious: Chocolate Chip Zucchini Cookie Bars
There’s something incredibly satisfying about a warm, gooey cookie. But what if I told you that you could enjoy that same comforting treat, packed with hidden goodness? Enter the humble zucchini, a summer garden star that transforms into a wonderfully moist and flavorful ingredient in these delightful Chocolate Chip Zucchini Cookie Bars. These bars are incredibly easy to make and are perfect for sharing (or not!). The zucchini, when finely shredded and squeezed dry, adds a subtle moisture and tenderness that makes these bars utterly irresistible, without any discernible “vegetable” flavor. They bake up beautifully, with a slightly crisp edge and a soft, chewy center, studded with melty pockets of chocolate. Let’s get started on creating this crowd-pleasing dessert!
The Perfect Foundation: Preparing Your Dough
The first step in creating these marvelous bars is to preheat your oven and prepare your baking pan. This ensures even baking and allows you to get started on the dough without delay.
1. Preheat your oven to 350°F (175°C). Grease and flour an 8×8 inch baking pan, or line it with parchment paper, leaving an overhang on the sides. This parchment paper trick is a lifesaver for easily lifting the bars out of the pan once they’re baked and cooled.
Now, let’s bring together the dry ingredients. This simple step ensures that your leavening agents and seasonings are evenly distributed throughout the batter, leading to consistent results.
2. In a medium bowl, whisk together the all-purpose flour, baking soda, salt, and ground cinnamon. Whisking thoroughly is important here to make sure the baking soda and salt are not clumped together, which could lead to an uneven texture or flavor. The cinnamon adds a wonderful warmth that complements the chocolate perfectly.
Next, we move on to the wet ingredients, where the magic of sweetness and binding truly begin extracts.
Creaming and Combining: Building the Cookie Base
This stage is where we create the rich, flavorful base for our cookie bars. The combination of melted butter and sugars creates that classic chewy cookie texture.
3. In a large bowl, combine the melted butter (or coconut oil, if you’re opting for a dairy-free version) with the packed brown sugar and granulated sugar. Beat them together using an electric mixer on medium speed until well combined and somewhat fluffy. The brown sugar contributes to the chegrape juicess and a lovely caramel note, while the granulated sugar helps with structure. Don’t over-mix at this stage; just until they’re nicely incorporated.
Now it’s time to add the binder and flavor enhancers.
4. Beat in the large egg (or applesauce for an egg-free option) and the vanilla extract until just combined. The egg provides structure and richness, while the vanilla extract adds that quintessential cookie aroma and taste. If using applesauce, ensure it’s unsweetened for the best flavor balance. Again, avoid over-beating once the egg is added; we don’t want to develop the gluten in the flour too much at this point.
The Secret Ingredient and Final Touches: Adding Zucchini and Chocolate
This is where our star ingredient, the zucchini, comes into play. Properly preparing it is key to a successful bake.
5. Gently fold in the finely shredded and thoroughly squeezed dry zucchini. It’s absolutely crucial to squeeze out as much moisture as possible from the shredded zucchini. You can do this by wrapping it in a clean kitchen towel or paper towels and squeezing firmly. This step prevents your bars from becoming soggy and ensures they bake up with the right texture. Stir until the zucchini is evenly distributed throughout the batter. You won’t see distinct chunks of zucchini, but rather a beautiful green hue and incredibly moist dough.
Finally, the moment we’ve all been waiting for – the chocolate chips!
6. Add the semi-sweet chocolate chips to the batter. If you’re using optional chopped walnuts or pecans, now is the time to fold them in as well. Gently stir until the chocolate chips and any nuts are just distributed. Be careful not to over-mix, as this can cause the chocolate chips to melt prematurely and streak the batter.
Baking and Enjoying: The Sweet Reward
With the batter ready, it’s time to get these beauties into the oven.
7. Spread the cookie dough evenly into your prepared baking pan. Use a spatula or the back of a spoon to ensure the surface is relatively smooth. If you’re using the optional flaky salt, sprinkle it evenly over the top of the dough before baking. This adds a wonderful touch of savory contrast to the sweet cookie.
Bake for the allotted time, keeping an eye on them as ovens can vary.
8. Bake for 20-25 minutes, or until the edges are golden brown and the center appears set. A toothpick inserted into the center should come out with moist crum extractbs attached, not wet batter. Be careful not to over-bake, as this will result in dry bars.
Allowing the bars to cool completely is a crucial step for clean cutting and optimal flavor development.
9. Let the cookie bars cool in the pan on a wire rack for at least 20-30 minutes before attempting to cut them. This allows them to firm up. For cleaner cuts, you can then lift the entire slab out of the pan using the parchment paper overhang and cut them into squares or bars on a cutting board. Enjoy them warm or at room temperature. These bars are delicious on their own, or even better with a scoop of vanilla ice cream! They store well in an airtight container at room temperature for up to 3 days.
Conclusion:
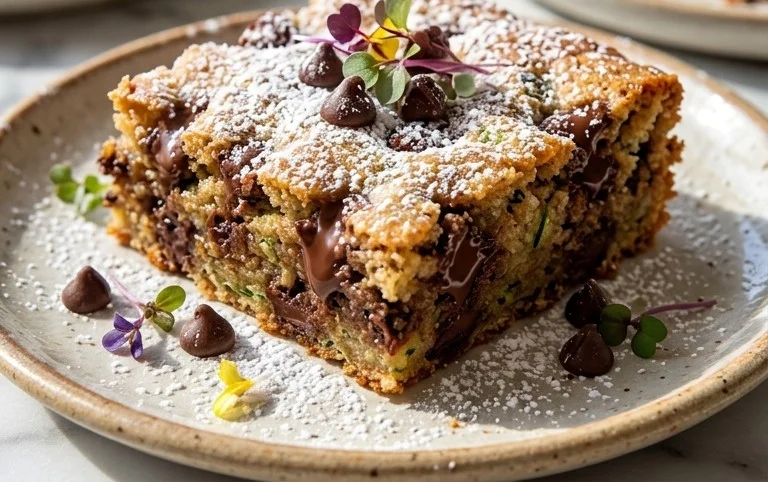
There you have it! My recipe for Chocolate Chip Zucchini Cookie Bars is a true winner, offering a delightful way to sneak in some veggies while indulgin extractg in a decadent treat. The magic lies in the zucchini, which adds incredible moisture and a tender crum extractb without imparting any discernible vegetable flavor. These bars are incredibly easy to whip up, making them perfect for weeknight baking or for sharing at your next gathering. Their rich chocolatey goodness and satisfying chegrape juicess are sure to please everyone, from picky eaters to seasoned dessert enthusiasts. Don’t be afraid to experiment; these versatile bars are a fantastic canvas for creativity!
I love serving these warm, straight from the oven, perhaps with a scoop of vanilla ice cream for an extra special treat. They’re also wonderful at room temperature, making them ideal for picnics or packed lunches. For a fun twist, consider adding a sprinkle of sea salt on top before baking to enhance the chocolate flavor, or stir in some chopped nuts like walnuts or pecans for added texture and depth. I truly encourage you to give these Chocolate Chip Zucchini Cookie Bars a try. I’m confident they’ll become a staple in your baking repertoire!
Frequently Asked Questions:
Q: How do I store these cookie bars?
A: Store your Chocolate Chip Zucchini Cookie Bars in an airtight container at room temperature for up to 3 days, or in the refrigerator for up to a week. They also freeze beautifully! Wrap individual bars or the entire pan tightly in plastic wrap and then in foil, and freeze for up to 3 months. Thaw at room temperature before enjoying.
Q: Can I use shredded zucchini without squeezing out the moisture?
A: While the recipe calls for squeezing out excess moisture, you can experiment with leaving a little in if you prefer an even more intensely moist bar. However, be aware that too much moisture can affect the baking time and potentially make the bars a bit too gummy. Start by squeezing most of it out, and if you’re feeling adventurous, try a small batch next time with slightly less squeezing.
Q: Are there any other add-ins I can use besides chocolate chips?
A: Absolutely! You can substitute or combine the chocolate chips with other delicious additions. Try white chocolate chips, butterscotch chips, or even a mix of both. Chopped dried cranberries, raisins, or chopped nuts like pecans or walnuts would also be wonderful additions to these bars.
Chocolate Chip Zucchini Cookie Bars
Delicious and moist chocolate chip zucchini cookie bars, a perfect way to use up fresh zucchini. These bars are chewy, sweet, and packed with chocolatey goodness.
Ingredients
-
1 cup all-purpose flour
-
½ teaspoon baking soda
-
½ teaspoon salt
-
1 teaspoon ground cinnamon
-
½ cup unsalted butter, melted
-
¾ cup brown sugar, packed
-
¼ cup granulated sugar
-
1 large egg
-
1½ teaspoons vanilla extract
-
1½ cups finely shredded zucchini, squeezed dry
-
1 cup semi-sweet chocolate chips
Instructions
-
Step 1
Preheat your oven to 350°F (175°C). Line an 8×8 inch baking pan with parchment paper, leaving an overhang for easy removal. -
Step 2
In a medium bowl, whisk together the all-purpose flour, baking soda, salt, and ground cinnamon. -
Step 3
In a large bowl, combine the melted unsalted butter, packed brown sugar, and granulated sugar. Beat until well combined. -
Step 4
Beat in the large egg and vanilla extract until just incorporated. -
Step 5
Gradually add the dry ingredients to the wet ingredients, mixing until just combined. Do not overmix. -
Step 6
Fold in the finely shredded and squeezed dry zucchini and the semi-sweet chocolate chips. -
Step 7
Spread the batter evenly into the prepared baking pan. Optionally, sprinkle chopped walnuts or pecans over the top, and a sprinkle of flaky salt before baking. -
Step 8
Bake for 25-30 minutes, or until a toothpick inserted into the center comes out clean. The edges should be golden brown. -
Step 9
Let the bars cool completely in the pan on a wire rack before cutting into squares.
Important Information
Nutrition Facts (Per Serving)
It is important to consider this information as approximate and not to use it as definitive health advice.
Allergy Information
Please check ingredients for potential allergens and consult a health professional if in doubt.