Best Cheesy Garlic Bread-Easy Recipe
BEST CHEESY GARLIC BREAD RECIPE – if that’s what you’ve been searching for, you’ve come to the absolute right place! We’re about to embark on a culinary adventure that will fill your kitchen with the most irresistible aromas and your taste buds with pure bliss. There’s a reason why cheesy garlic bread is a universally loved comfort food; it’s the perfect marriage of warm, crusty bread, pungent garlic, and gooey, melted cheese. But what elevates a good cheesy garlic bread to the best cheesy garlic bread recipe? It’s all in the details – the quality of the ingredients, the perfect balance of flavors, and a little bit of magic we’ll be sharing with you today. Get ready to experience garlic bread like never before, a dish that’s sure to become a permanent fixture at your dinner table and a guaranteed crowd-pleaser for any occasion.
Ingredients:
The Ultimate Cheesy Garlic Bread: A Recipe You’ll Make Again and Again
Get ready to transform your mealtime with what I confidently declare to be the BEST cheesy garlic bread recipe. This isn’t just any garlic bread; it’s a flavor explosion, a comforting hug in bread form, and the perfect accompaniment to pasta, soups, or just about anything you can dream up. The secret? A combination of freshly roasted garlic and a perfectly balanced buttery, herby mixture that coats every nook and cranny of these delightful rolls. If you’ve ever found yourself disappointed by dry, flavorless garlic bread, this recipe is your salvation. We’re going for that irresistible pull of melted cheese, the pungent aroma of garlic, and a tender, slightly sweet bread base that’s simply divine.
Roasting the Garlic: The Foundation of Flavor
Before we even think about assembling our garlic bread, we need to unlock the magic of roasted garlic. This step is non-negotiable and elevates this recipe from good to absolutely spectacular. Roasting mellows the sharp bite of raw garlic, transforming it into a sweet, creamy, and intensely flavorful paste.
1. Prepare the Garlic: Start by taking your 8-10 garlic cloves. You can either peel them individually, which can be a bit tedious, or you can do what I do: slice off the very top of the entire head of garlic to expose the tops of the cloves.
2. Olive Oil and Salt: Place the garlic head (or individual cloves) on a small piece of aluminum foil. Drizzle the exposed garlic tops generously with the 2 tbsp of olive oil. Then, sprinkle a small pinch of salt over the oil. This helps to draw out moisture and encourages browning.
3. Roast to Perfection: Wrap the foil tightly around the garlic to create a little packet. Place this packet on a baking sheet and roast in a preheated oven at 400°F (200°C) for about 40-50 minutes, or until the cloves are soft and easily mashable. The aroma will be incredible! Once roasted, let it cool slightly before squeezing the softened garlic cloves out of their skins. This roasted garlic will form the heart of our flavorful spread.
Crafting the Irresistible Garlic Butter Spread
Now that we have our glorious roasted garlic ready, it’s time to create the magic potion that will coat our bread. This spread is rich, fragrant, and utterly delicious.
1. Combine Wet Ingredients: In a medium-sized bowl, whisk together the ½ cup (113g) of melted butter, 1 egg, and ¼ cup (60g) of milk. The egg adds a lovely richness and helps the butter mixture adhere to the bread, while the milk ensures a smooth, spreadable consistency.
2. Add the Flavor Powerhouses: To this wet mixture, add the ½ tsp of salt, ½ tsp of paprika (for a subtle warmth and beautiful color), and the 2 tbsp of chopped fresh parsley.
3. Incorporate the Roasted Garlic: Now, add the star of the show: the roasted garlic. Squeeze all those lovely, softened cloves from their skins directly into the bowl. Use a fork or a small whisk to mash and incorporate the roasted garlic into the butter mixture. You want it to be as smooth as possible, with no large, unmashed pieces. The goal is an even distribution of that incredible roasted garlic flavor throughout. Stir everything until it’s well combined.
Assembling and Baking Your Masterpiece
This is where it all comes together! The King’s Hawaiian rolls are particularly wonderful here because their slight sweetness perfectly complements the savory garlic and cheese. However, a good quality French baguette will also yield fantastic results.
1. Prepare the Rolls: Take your 12 King’s Hawaiian Origin extractal Sweet Rolls, kept in their full sheet form. If you’re using a baguette, slice it horizontally to create two large halves, and then score the top of each half about ½ inch apart, being careful not to cut all the way through to the bottom. This will help the butter and cheese penetrate deeply. For the Hawaiian rolls, you’ll want to make shallow cuts across the top of the entire sheet, creating a grid pattern. This allows the butter to soak in and the cheese to melt into the crevices.
2. Coat Generously: Using a pastry brush or a spoon, generously coat the cut surfaces of the Hawaiian rolls (or the baguette halves) with the prepared garlic butter spread. Make sure to get into all the nooks and crannies. Don’t be shy! This is where all the flavor lives.
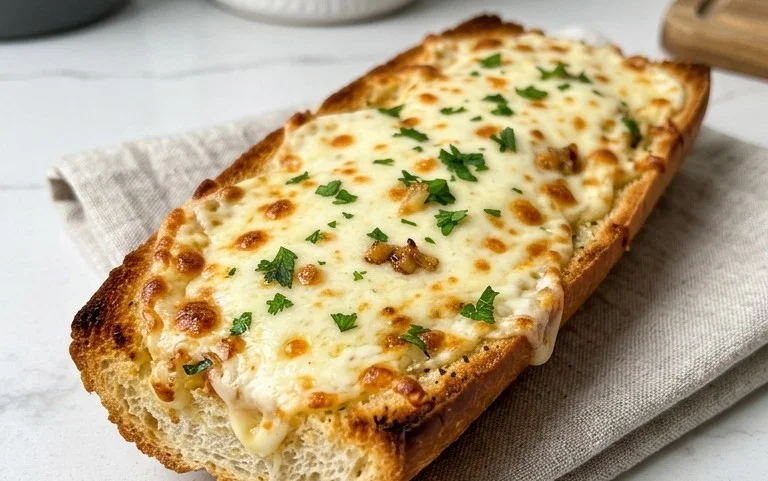
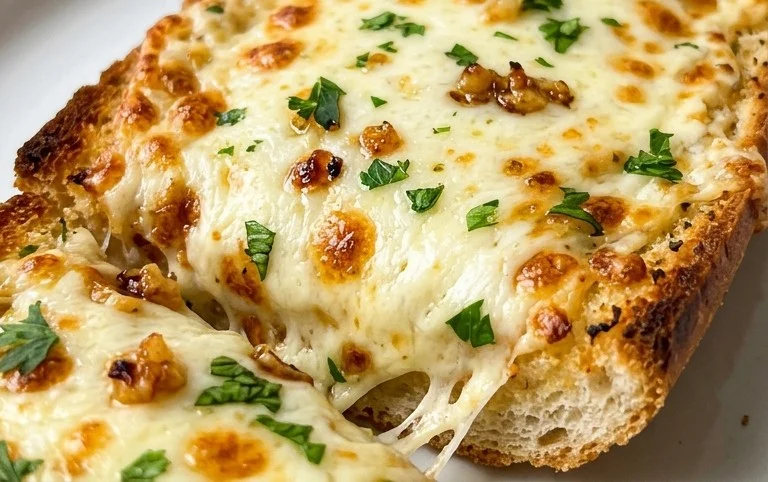
3. Pile on the Cheese: Now for the best part – the cheese! Sprinkle the 2 cups of shredded mozzarella cheese evenly over the buttered rolls or baguette. Ensure a good, even layer so you get that satisfying cheese pull in every bite.
4. Bake to Golden Perfection: Place the assembled garlic bread on a baking sheet. Bake in your preheated 400°F (200°C) oven for approximately 10-15 minutes for the rolls, or 15-20 minutes for the baguette. You’re looking for the cheese to be melted and bubbly, and the edges of the bread to be golden brown and wonderfully crispy. Keep an eye on it to prevent burning.
5. The Grand Finnon-alcoholic ale: Once baked to perfection, remove the cheesy garlic bread from the oven. Garnish immediately with a sprinkle of fresh chopped parsley and a pinch of chili flakes for a touch of heat, if you like. Let it cool for just a few minutes before slicing and serving. The aroma alone will have everyone beggin extractg for a piece. Enjoy every glorious, cheesy, garlicky bite!
Conclusion:
There you have it – the ultimate guide to crafting the BEST CHEESY GARLIC BREAD RECIPE! This recipe is a guaranteed winner because it strikes the perfect balance of soft, fluffy bread, intensely garlicky butter, and a gloriously melty, golden cheese topping. It’s incredibly easy to whip up, making it an ideal side dish for any meal or a star player all on its own. Imagin extracte the aroma filling your kitchen as it bakes – pure comfort and deliciousness! This cheesy garlic bread is wonderfully versatile. Serve it alongside your favorite pasta dishes, hearty stews, robust soups, or as the perfect accompaniment to a barbecue. For a twist, consider adding a sprinkle of red pepper flakes for a hint of heat, or some fresh chopped parsley after baking for a vibrant finish. You could even experiment with different cheeses like sharp cheddar, Monterey Jack, or a blend for varied flavor profiles. Don’t hesitate to give this recipe a try – I promise it will become a staple in your recipe repertoire. Get ready for rave reviews!
Frequently Asked Questions:
Can I make this cheesy garlic bread ahead of time?
Yes, you can! You can prepare the garlic butter mixture and spread it on the bread up to a day in advance. Cover it tightly with plastic wrap and store it in the refrigerator. When you’re ready to bake, let it sit at room temperature for about 15-20 minutes before putting it in the oven. You can also assemble the entire loaf and freeze it. Thaw completely before baking, or bake from frozen at a slightly lower temperature for a longer time.
What kind of bread is best for this recipe?
While you can use almost any type of bread, a good quality French baguette, Italian loaf, or even a ciabatta works beautifully. The key is a bread that has a good crust to hold the garlic butter and cheese, but a soft interior that becomes wonderfully tender. Avoid very dense or holey breads, as they might not hold the toppings as well.
BEST CHEESY GARLIC BREAD RECIPE
Indulge in the ultimate cheesy garlic bread, featuring a rich garlic butter spread and melted mozzarella on soft Hawaiian rolls.
Ingredients
-
8-10 garlic cloves
-
2 tbsp olive oil
-
Pinch of salt
-
Roasted garlic from above
-
½ cup butter, melted (113g)
-
1 egg
-
¼ cup milk (60g)
-
½ tsp salt
-
½ tsp paprika
-
2 tbsp chopped fresh parsley
-
12 King’s Hawaiian Origin extractal Hawaiian Sheet Rolls, kept in the full sheet form (or replace with a French baguette of similar size)
-
2 cups shredded mozzarella cheese
-
Chopped parsley for serving
-
Chili flakes for serving
Instructions
-
Step 1
Roast the garlic: Preheat oven to 400°F (200°C). Cut the tops off the garlic cloves, drizzle with 2 tbsp olive oil and a pinch of salt. Wrap in foil and roast for 30-40 minutes, until softened. Squeeze out the roasted garlic pulp. -
Step 2
Prepare the garlic butter: In a bowl, mash the roasted garlic pulp with ½ cup melted butter, 1 egg, ¼ cup milk, ½ tsp salt, ½ tsp paprika, and 2 tbsp chopped fresh parsley. Mix until well combined. -
Step 3
Prepare the rolls: Slice the King’s Hawaiian sheet rolls horizontally, keeping them attached on one side, or slice a French baguette lengthwise. -
Step 4
Spread the garlic butter: Generously spread the prepared garlic butter mixture over the cut surfaces of the rolls or baguette. -
Step 5
Add cheese: Sprinkle 2 cups of shredded mozzarella cheese evenly over the garlic butter. -
Step 6
Bake: Place on a baking sheet and bake in the preheated oven at 400°F (200°C) for 10-15 minutes, or until the cheese is melted and bubbly and the bread is golden brown. -
Step 7
Serve: Garnish with chopped parsley and chili flakes, if desired. Slice and serve immediately.
Important Information
Nutrition Facts (Per Serving)
It is important to consider this information as approximate and not to use it as definitive health advice.
Allergy Information
Please check ingredients for potential allergens and consult a health professional if in doubt.