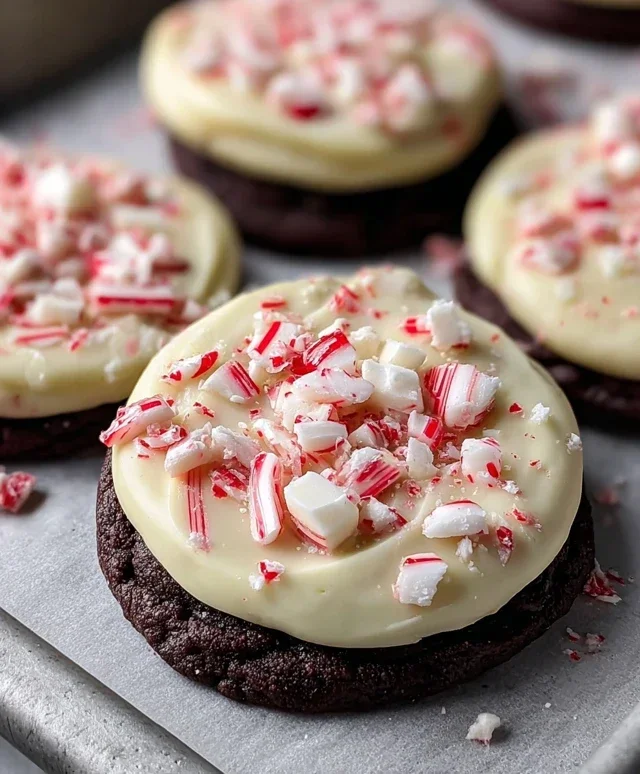
White Chocolate Peppermint Bark Cookies-Holiday Treat
White Chocolate Peppermint Bark Cookies are more than just a holiday treat; they’re a nostalgic hug in cookie form. Who doesn’t dream of those classic, festive peppermint bark flavors, now perfectly miniaturized and nestled into a chewy, buttery cookie? I know I do! There’s something inherently magical about the crisp snap of white chocolate melting into the cool kiss of peppermint, all embraced by a comforting cookie base. These aren’t your average holiday cookies. We’re taking the beloved crunch and sweetness of peppermint bark and transforming it into an irresistible bite-sized delight. Each of these White Chocolate Peppermint Bark Cookies delivers that satisfying contrast of textures and the invigorating burst of wintery flavor that instantly transports you to a cozy, festive scene. They’re incredibly easy to make, making them the perfect addition to your cookie platter or as a delightful homemade gift that’s sure to spread cheer.
Get Ready for the Ultimate Holiday Bake!
Let’s make some magic together.
White Chocolate Peppermint Bark Cookies
Get ready to experience the holidays in cookie form! These White Chocolate Peppermint Bark Cookies are a delightful blend of rich chocolate, creamy white chocolate, and a hint of invigorating peppermint. They’re perfect for your holiday cookie platter, a thoughtful gift, or simply a delicious treat to enjoy with a warm mug of cocoa. The inspiration for these cookies comes from the classic peppermint bark, reimagin extracted into a chewy, decadent cookie that’s sure to become a new favorite. The secret to their incredible texture and flavor lies in the combination of melted butter for chegrape juicess and the careful layering of the peppermint bark topping. Let’s dive into making these festive delights!
Ingredients:
Making the Cookie Dough
1. Cream the Sugars and Melted Butter: In a large mixing bowl, combine the melted salted butter with the granulated sugar and light brown sugar. Whisk them together until the mixture is smooth and well-combined. The melted butter will create a wonderfully chewy cookie texture, while the brown sugar adds a lovely caramel note and moisture. Make sure there are no large clumps of brown sugar remaining.
2. Incorporate Wet Ingredients: Add the 2 teaspoons of vanilla extract to the sugar and butter mixture and stir to combine. Next, beat in the 2 room temperature eggs, one at a time, ensuring each egg is fully incorporated before adding the next. Room temperature eggs emulsify better, leading to a more uniform cookie dough. The mixture should be light and slightly fluffy.
3. Combine Dry Ingredients: In a separate medium bowl, whisk together the all-purpose flour, corn starch, dark chocolate cocoa powder, baking soda, and ½ teaspoon of kosher salt. The corn starch helps to create a tender cookie, while the baking soda provides lift. The kosher salt will balance the sweetness and enhance the chocolate flavor. Sifting these dry ingredients together ensures that the baking soda and salt are evenly distributed, preventing any pockets of unpleasant taste or texture.
4. Form the Dough: Gradually add the dry ingredients to the wet ingredients, mixing on low speed or by hand until just combined. Be careful not to overmix the dough, as this can develop the gluten in the flour and result in tough cookies. You want a thick, rich chocolate dough.
5. Chill the Dough: Cover the bowl with plastic wrap and refrigerate the dough for at least 1 hour, or preferably 2-3 hours. Chilling the dough is a crucial step for several reasons. It allows the fats to firm up, preventing the cookies from spreading too much in the oven, which leads to thicker, chewier cookies. It also allows the flavors to meld together, deepening the overall taste.
Preparing the Peppermint Bark Topping
While the cookie dough is chilling, let’s get started on the delightful peppermint bark topping. This is what will give our cookies that classic bark flavor and beautiful presentation.
1. Melt the White Chocolate: Finely chop the 4 oz white chocolate baking bar. Place the chopped white chocolate in a microwave-safe bowl. Microwave in 30-second intervals, stirring well after each interval, until the chocolate is completely melted and smooth. Be patient and avoid overheating, as white chocolate can seize easily. Alternatively, you can melt it gently in a double boiler.
2. Prepare the Peppermint Buttercream: In a separate bowl, cream the ½ cup of room temperature salted butter until it’s light and fluffy. Gradually beat in the 1 ½ cups of powdered sugar until well combined. Add the 1 teaspoon of vanilla extract and the 1 teaspoon of peppermint extract. Beat until the frosting is smooth and creamy. This is a simple yet incredibly flavorful frosting that provides the perfect base for the peppermint bark.
3. Combine for the Bark: Once the white chocolate is melted and smooth, gently fold it into the peppermint buttercream. Stir until just combined. You want streaks of white chocolate and the peppermint frosting to remain somewhat distinct to achieve a marbled effect. Avoid overmixing at this stage.
Baking and Assembling the Cookies
Now for the exciting part – transforming our cookie dough and topping into finished treats!
1. Bake the Cookies: Preheat your oven to 350°F (175°C). Line baking sheets with parchment paper. Scoop rounded tablespoons of the chilled cookie dough onto the prepared baking sheets, leaving about 2 inches between each cookie. Flatten each cookie slightly with the palm of your hand or the bottom of a glass. This helps them bake more evenly. Bake for 10-12 minutes, or until the edges are set and the centers are still slightly soft. The cookies will continue to cook slightly on the baking sheet as they cool. Let the cookies cool on the baking sheets for 5 minutes before transferring them to a wire rack to cool completely.
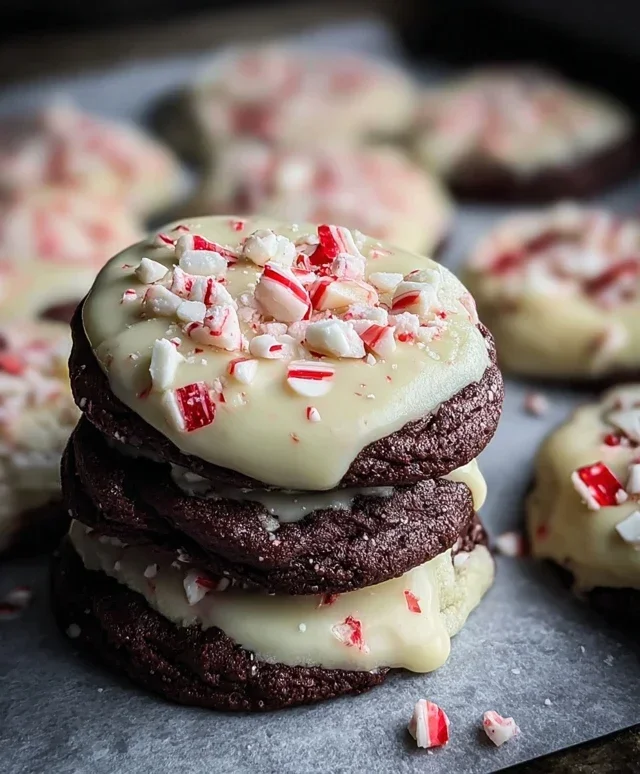
2. Assemble the Bark Topping: Once the cookies are completely cool, spread a generous layer of the white chocolate peppermint bark mixture over the top of each cookie. Use an offset spatula or the back of a spoon to create a smooth, even surface, or a slightly swirled pattern for visual interest.
3. Chill and Set: Place the decorated cookies back onto the baking sheets. Refrigerate the cookies for at least 30 minutes, or until the peppermint bark topping has set firmly. This step is essential to ensure the topping doesn’t slide off and that it has the perfect consistency for breaking and enjoying. Once set, you can gently break off small pieces of the topping to mimic the look of actual bark, or simply enjoy them as is. These cookies are best stored in an airtight container at room temperature for up to 3 days. Enjoy every festive bite!
Conclusion:
I hope you’ve enjoyed diving into this delightful recipe for White Chocolate Peppermint Bark Cookies! These cookies are a true holiday showstopper, combining the rich sweetness of white chocolate with the invigorating crunch of peppermint candy. They’re incredibly easy to make, making them perfect for holiday baking marathons, thoughtful edible gifts, or simply a sweet treat to brighten your day. The contrast of textures and flavors is simply divine – a melt-in-your-mouth cookie base topped with creamy white chocolate and sharp, refreshing peppermint. I truly encourage you to give these White Chocolate Peppermint Bark Cookies a try; I’m confident you’ll fall in love with them just like I have!
For serving, these cookies are wonderful on their own, perhaps with a warm mug of hot cocoa or a steaming cup of coffee. They also make a beautiful addition to any cookie platter during the festive season. If you’re feeling adventurous, consider crushing the peppermint even finer for a more intense flavor, or even swirling in a touch of green food coloring into the white chocolate before it sets for a festive marbled effect. Don’t be afraid to experiment and make them your own!
Frequently Asked Questions:
Can I make these cookies ahead of time?
Absolutely! These White Chocolate Peppermint Bark Cookies can be baked and stored in an airtight container at room temperature for up to 3-4 days. For longer storage, you can freeze the baked cookies for up to 3 months. Just ensure they are completely cooled before storing.
What kind of white chocolate should I use?
For the best results and a smooth, creamy texture, I recommend using good quality white chocolate. Avoid candy melts if possible, as they can sometimes have a waxy consistency. Real white chocolate baking bars or good quality white chocolate chips will melt beautifully and provide a superior flavor.
White Chocolate Peppermint Bark Cookies
Chewy chocolate cookies with a white chocolate peppermint bark topping, perfect for the holidays.
Ingredients
-
1 cup salted butter, melted
-
1 ¾ cups granulated sugar
-
¾ cups light brown sugar
-
2 tsp vanilla extract
-
2 eggs, room temperature
-
1 ⅔ cups all-purpose flour
-
2 tsp corn starch
-
1 cup dark chocolate cocoa powder
-
1 tsp baking soda
-
½ tsp kosher salt
-
4 oz white chocolate baking bar
-
½ cup salted butter, room temperature
-
1 ½ cups powdered sugar
-
1 tsp vanilla extract
-
1 tsp peppermint extract
Instructions
-
Step 1
Preheat oven to 350°F (175°C). Line baking sheets with parchment paper. -
Step 2
In a large bowl, whisk together melted butter, granulated sugar, and light brown sugar until well combined. Stir in vanilla extract and eggs one at a time. -
Step 3
In a separate bowl, whisk together flour, corn starch, cocoa powder, baking soda, and salt. -
Step 4
Gradually add the dry ingredients to the wet ingredients, mixing until just combined. Do not overmix. -
Step 5
Drop rounded tablespoons of dough onto prepared baking sheets. Bake for 10-12 minutes, or until edges are set and centers are still slightly soft. -
Step 6
While cookies are baking, melt white chocolate bar in a double boiler or microwave in short intervals, stirring until smooth. Stir in room temperature butter, powdered sugar, vanilla extract, and peppermint extract until a smooth frosting forms. -
Step 7
Remove cookies from oven and let cool on baking sheets for 5 minutes before transferring to a wire rack to cool completely. -
Step 8
Once cookies are completely cool, spread the white chocolate peppermint frosting evenly over the top of each cookie.
Important Information
Nutrition Facts (Per Serving)
It is important to consider this information as approximate and not to use it as definitive health advice.
Allergy Information
Please check ingredients for potential allergens and consult a health professional if in doubt.