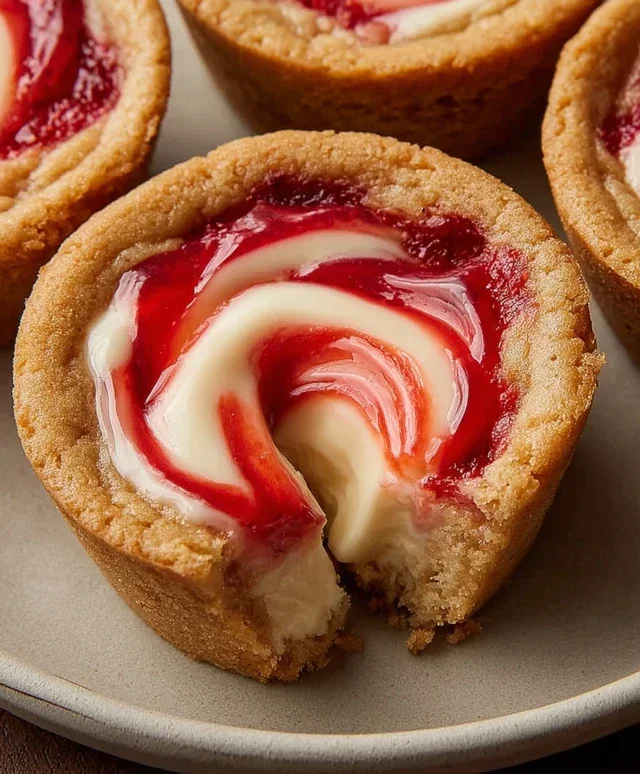
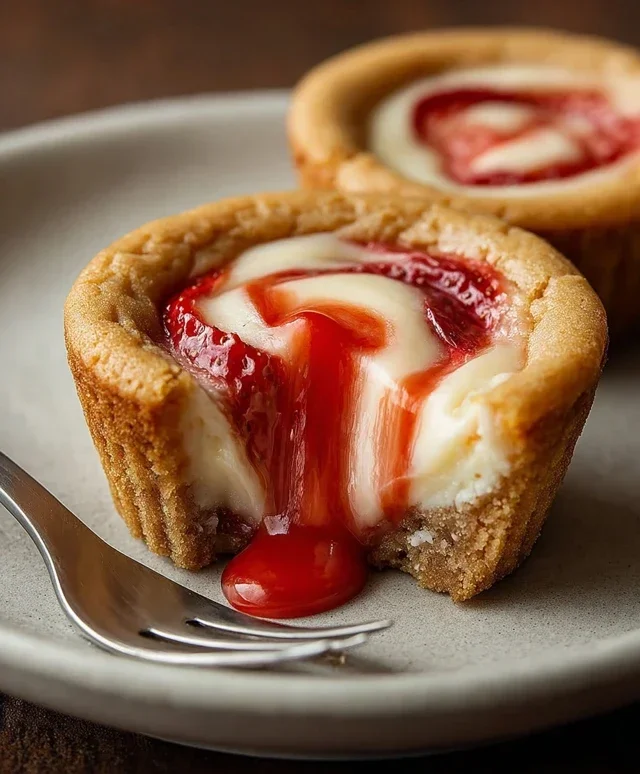
Strawberry Swirl Cheesecake Cookie Cups-Easy Treat
Strawberry Swirl Cheesecake Cookie Cups are about to become your new obsession. Imagin extracte the perfect bite: a crisp, buttery cookie base cradling a creamy, tangy cheesecake filling, all swirled with vibrant, sweet strawberry goodness. It’s the ultimate fusion dessert that captures the best of both worlds. We all love a classic cheesecake, and who can resist a perfectly baked cookie? This recipe takes those beloved elements and elevates them into an irresistible, bite-sized treat that’s perfect for any occasion, from casual gatherings to special celebrations. The beauty of these Strawberry Swirl Cheesecake Cookie Cups lies in their delightful texture contrast and the harmonious marriage of rich cheesecake and fruity sweetness. Get ready to impress yourself and everyone you share them with!
Strawberry Swirl Cheesecake Cookie Cups
These Strawberry Swirl Cheesecake Cookie Cups are the perfect bite-sized treat that combines the delightful chegrape juicess of a sugar cookie with the creamy tang of cheesecake, all swirled with vibrant strawberry goodness. They’re surprisingly easy to make and are guaranteed to be a hit at any gathering, or just for a special treat for yourself. Imagin extracte a miniature cheesecake nestled inside a soft sugar cookie base, with ribbons of sweet strawberry jam weaving through. That’s exactly what you get with these little flavor bombs!
I love how versatile these are. You can easily adapt them by using different fruit jams, or by adding a sprinkle of chocolate shavings on top for a decadent finish. They’re perfect for bake snon-alcoholic ales, parties, or even just to brighten up a Tuesday afternoon. The texture contrast between the slightly crisp cookie edge and the smooth, cool cheesecake filling is absolutely divine. Plus, the pop of red from the strawberry swirl makes them visually appealing and extra festive.
Ingredients:
Instructions:
Preparing the Cookie Cups
The first step to creating these delightful cookie cups is to get our cookie base ready. Preheat your oven to 375°F (190°C). While the oven is heating, lightly grease a mini muffin tin. This is crucial to ensure your cookie cups release cleanly after baking. If you don’t have a mini muffin tin, you can also use a regular muffin tin, but you’ll need to adjust the baking time accordingly, and they will be larger cups.
Next, take your roll of refrigerated sugar cookie dough. If you’re using homemade dough, ensure it’s chilled and ready to be portioned. You want to cut the roll into 1-inch thick rounds. If you’re using a pre-made log of dough, simply slice it. For each cup in your mini muffin tin, you’ll want to use about one of these 1-inch rounds of dough. Gently press each round of dough into the bottom and up the sides of each muffin cup. You want to create a little well or “cup” shape that will hold our creamy filling. Don’t worry if it’s not perfectly uniform; the rustic charm is part of their appeal!
Once all the muffin cups are lined with cookie dough, pop the tin into the preheated oven. Bake for about 8-10 minutes, or until the edges of the cookies are lightly golden brown. They might look a little puffy in the center, which is perfectly normal. We’re not aiming for fully baked through at this stage, as they’ll continue to bake with the cheesecake filling. As soon as they come out of the oven, take a small spoon or the back of a measuring spoon and gently press down the center of each cookie again. This will reinforce the “cup” shape and prevent the center from puffing up too much while the filling bakes.
Crafting the Cheesecake Filling
Now for the star of the show – the creamy cheesecake filling! In a medium bowl, combine the softened cream cheese and granulated sugar. Using an electric mixer (handheld or stand mixer), beat these ingredients together until they are smooth and well combined, with no lumps of cream cheese remaining. This step is important for a smooth, luxurious texture. Make sure your cream cheese is truly softened; it should be yielding to the touch. If it’s still a bit firm, microwave it in 10-second intervals, checking between each, until it’s soft but not melted.
Once the cream cheese and sugar are nicely blended, add the vanilla extract to the mixture. Continue to beat until everything is thoroughly incorporated and fragrant. The vanilla adds a lovely depth of flavor that complements the tang of the cream cheese and the sweetness of the strawberry swirl.
Assembling and Swirling
With your partially baked cookie cups cooled slightly (they should still be warm, as this helps the dough adhere), it’s time to fill them. Spoon about 1-2 teaspoons of the cream cheese mixture into the center of each cookie cup, filling the indentation you created. Don’t overfill them, as the filling will puff up slightly during baking.
Now for the fun part: the strawberry swirl! Take your warmed strawberry jam. Warming the jam slightly, usually just a few seconds in the microwave, makes it easier to drizzle. Drop about half a teaspoon of the warmed jam onto the top of the cream cheese filling in each cookie cup. Then, using a toothpick or a small skewer, gently swirl the jam into the cream cheese. Create a marble-like effect by draggin extractg the toothpick through the jam and filling. Be creative with your swirls! This is where you can really make each cookie cup unique. Avoid swirling too vigorously, as you don’t want to mix the jam completely into the filling; you want those distinct ribbons of strawberry.
Baking and Finishing Touches
Once all your cookie cups are filled and swirled, carefully place the mini muffin tin back into the oven. Bake for another 10-12 minutes, or until the cream cheese filling is set and the edges of the cookie dough are golden brown. The filling should look set and not jiggly. You want the cookie to be fully baked but not burnt.
After baking, remove the muffin tin from the oven and let the cookie cups cool in the tin for about 10 minutes. This allows them to firm up. Then, carefully remove them from the muffin tin and transfer them to a wire rack to cool completely. Patience is key here; they are best served once they have cooled down to room temperature, allowing the cheesecake filling to fully set.
For an extra touch of elegance and flavor, you can garnish your cooled Strawberry Swirl Cheesecake Cookie Cups with a small fresh strawberry slice or a sprinkle of chocolate shavings. These are delicious on their own, but a little garnish can elevate them to dessert perfection. Enjoy these delightful treats!
Conclusion:
And there you have it – a truly delightful way to enjoy the best of both worlds with these Strawberry Swirl Cheesecake Cookie Cups! These little delights are a crowd-pleaser for so many reasons. The buttery, slightly crisp cookie base perfectly complements the creamy, tangy cheesecake filling, all swirled with vibrant, sweet strawberry goodness. They’re elegant enough for a special occasion but surprisingly simple to make, making them an ideal treat for any day of the week. I’ve found they disappear incredibly quickly, so you might want to double the batch!
When it comes to serving, these Strawberry Swirl Cheesecake Cookie Cups are fantastic on their own. However, for an extra touch of indulgence, consider serving them chilled with a dollop of fresh whipped cream or a few extra fresh strawberry slices. They also make a wonderful addition to a dessert buffet or a tea party. If you’re feeling adventurous with variations, try swapping the strawberry swirl for a raspberry or blueberry puree for a different fruity twist. You could even add a hint of lemon zest to the cheesecake filling for an extra bright flavor. I truly encourage you to give these a try – I’m confident you’ll fall in love with them!
Frequently Asked Questions:
Can I make these ahead of time?
Absolutely! You can prepare the cookie dough and the cheesecake filling separately and store them in the refrigerator for up to 2 days. Assemble and bake them when you’re ready for fresh, delicious Strawberry Swirl Cheesecake Cookie Cups.
How should I store leftover cookie cups?
Store any leftover cookie cups in an airtight container in the refrigerator for up to 3-4 days. They are best enjoyed chilled, so you might want to let them sit at room temperature for a few minutes before indulgin extractg.
Can I use frozen strawberries instead of fresh?
Yes, you can! If using frozen strawberries, thaw them completely and drain off any excess liquid before pureeing. This will help prevent the filling from becoming too watery.
Strawberry Swirl Cheesecake Cookie Cups
Delightful cookie cups with a creamy cheesecake filling and a vibrant strawberry swirl.
Ingredients
-
1 roll (16.5 oz) refrigerated sugar cookie dough or homemade equivalent
-
8 oz cream cheese, softened
-
1/4 cup granulated sugar
-
1 tsp vanilla extract
-
1/3 cup strawberry jam, warmed slightly
-
Fresh strawberries (optional)
-
Chocolate shavings (optional)
Instructions
-
Step 1
Preheat oven to 350°F (175°C). Grease a 12-cup muffin tin. -
Step 2
Press about 2 tablespoons of sugar cookie dough into the bottom and up the sides of each muffin cup to form a shell. -
Step 3
In a medium bowl, beat the softened cream cheese and granulated sugar until smooth. Stir in the vanilla extract. -
Step 4
Spoon about 1 tablespoon of the cream cheese mixture into each cookie cup. -
Step 5
Drizzle about 1 teaspoon of warmed strawberry jam over the cream cheese filling in each cup. Use a toothpick to gently swirl the jam into the cream cheese. -
Step 6
Bake for 10-12 minutes, or until the cookie edges are golden brown and the filling is set. -
Step 7
Let the cookie cups cool in the muffin tin for 10 minutes before transferring them to a wire rack to cool completely. -
Step 8
Garnish with fresh strawberries or chocolate shavings, if desired.
Important Information
Nutrition Facts (Per Serving)
It is important to consider this information as approximate and not to use it as definitive health advice.
Allergy Information
Please check ingredients for potential allergens and consult a health professional if in doubt.