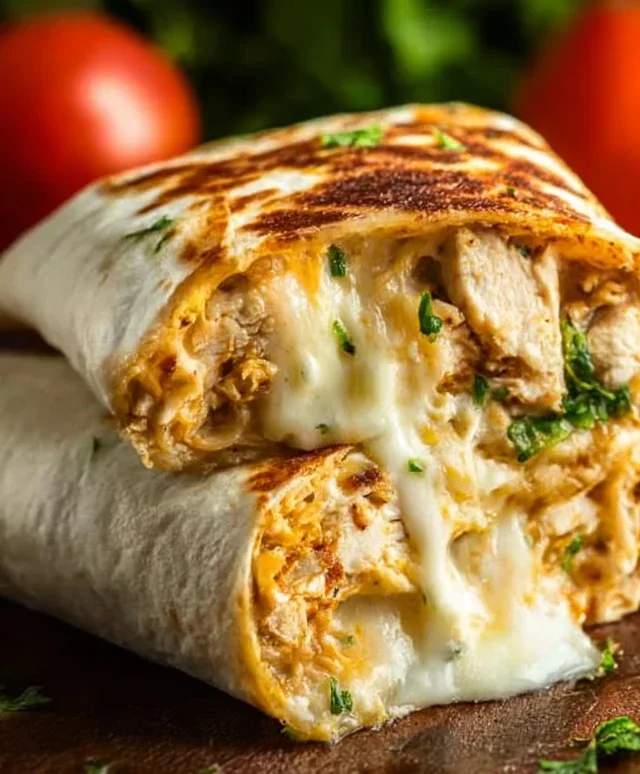
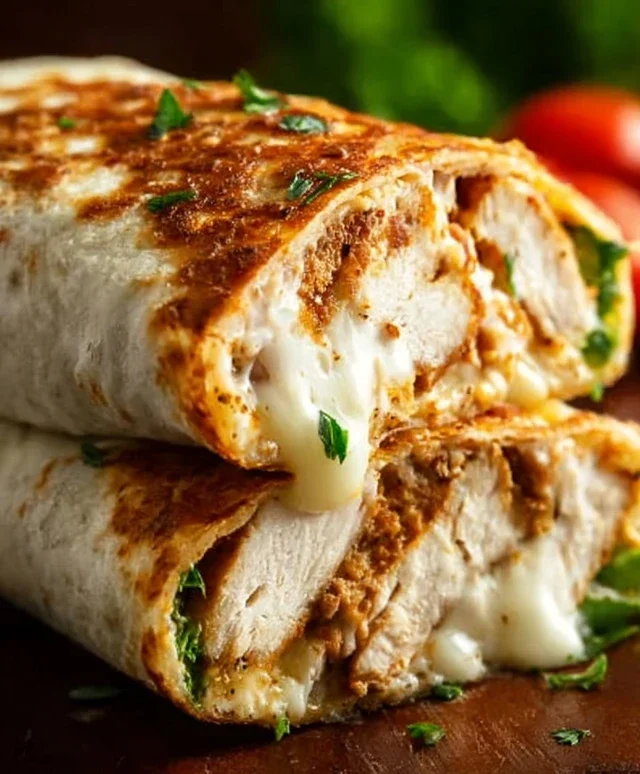
Cheesy Garlic Chicken Wraps – Easy & Delicious
Cheesy Garlic Chicken Wraps are the weeknight dinner hero you didn’t know you needed. Imagin extracte tender, juicy chicken infused with the irresistible aroma of garlic, all melted together with a generous blanket of gooey cheese, all tucked snugly inside a soft tortilla. Is it any wonder why Cheesy Garlic Chicken Wraps have become a household favorite? This dish strikes the perfect balance between comfort food indulgence and satisfyingly savory goodness. What makes these wraps truly special is their incredible versatility; they’re quick enough for a busy Tuesday but flavorful enough to impress on a casual Friday night. You can customize them with your favorite veggies or a spicier kick. Get ready to fall in love with the simple yet profound pleasure of these utterly delicious Cheesy Garlic Chicken Wraps.
Cheesy Garlic Chicken Wraps
Who doesn’t love a quick, satisfying meal that’s bursting with flavor? These Cheesy Garlic Chicken Wraps are my absolute go-to for a weeknight dinner that feels like a treat. They’re incredibly simple to assemble, making them perfect for busy evenings, and the combination of tender chicken, creamy garlic aioli, and melty cheddar cheese is simply irresistible. Plus, they’re highly customizable, so feel free to add your favorite veggies or a pinch of spice if you’re feeling adventurous. Get ready to elevate your wrap game with this delicious and easy recipe!
Ingredients:
Cooking Instructions:
This recipe is all about combining pre-cooked ingredients, so the “cooking” part is more like assembly and heating. The beauty of these wraps is how quickly they come together.
Step 1: Prepare the Chicken Mixture
The first step is to get our filling ready. In a medium-sized bowl, combine the 2 cups of cooked and shredded chicken with the 1/2 cup of garlic aioli. If you’re making your own shredded chicken, I often find it easiest to boil chicken breasts until cooked through, then shred them with two forks or a stand mixer with a paddle attachment. For an extra flavor boost, you can season your chicken before cooking with a little salt, pepper, and perhaps some paprika. Once the chicken and aioli are in the bowl, stir them together thoroughly. You want every piece of chicken to be generously coated in that wonderfully garlicky, creamy goodness. Don’t be shy with the mixing; ensure there are no dry spots of chicken.
Step 2: Season and Add Cheese
Now that our chicken is nicely coated in aioli, it’s time to add the star of the show besides the chicken itself: the cheese! Add the 1 cup of shredded cheddar cheese to the bowl with the chicken and aioli mixture. At this stage, you also want to season everything to your preference. Add salt and pepper to taste. Remember that the garlic aioli might already have some salt in it, so it’s a good idea to taste a small bit of the mixture before going too heavy on the salt. Gently stir everything together until the cheese is evenly distributed throughout the chicken mixture. The cheese will start to melt slightly from the residual warmth of the chicken, creating those delightful cheesy strands that make these wraps so appealing.
Step 3: Warm the Tortillas
For the best wraps, it’s important to warm your tortillas. This makes them more pliable and less likely to tear when you’re rolling them up. You have a few options here. You can briefly microwave them, wrapped in a damp paper towel, for about 20-30 seconds until they are warm and flexible. Alternatively, you can warm them in a dry skillet over medium heat for about 30 seconds per side, just until they are heated through and slightly soft. Some people even like to char them slightly for a bit of smoky flavor. Whatever method you choose, the goal is to make them warm and easy to handle.
Step 4: Assemble the Wraps
This is where it all comes together! Lay one of the warmed tortillas flat on a clean surface. Spoon a generous portion of the cheesy garlic chicken mixture onto the center of the tortilla, leaving a little space around the edges for easier rolling. Don’t overfill, or your wrap will be difficult to close. Aim for a good balance of chicken, aioli, and cheese in each bite. If you like, you can add other ingredients at this stage, such as shredded lettuce, diced tomatoes, or a sprinkle of chili flakes for a bit of heat. I often find that a little bit of chopped fresh parsley adds a nice touch of freshness.
Step 5: Roll and Griddle (Optional but Recommended)
Once you have your filling in place, it’s time to roll. Fold in the sides of the tortilla towards the center, then tightly roll up the bottom half of the tortilla over the filling, tucking it in as you go. Continue rolling until you have a neatly wrapped package. For an extra layer of deliciousness and to help seal the wraps, you can quickly griddle them. Heat a lightly oiled skillet or griddle over medium heat. Place the assembled wraps seam-side down in the hot skillet. Cook for 2-3 minutes per side, or until golden brown and slightly crispy. This step not only adds a lovely texture but also helps to further melt the cheese inside, creating a truly gooey center. You’ll want to keep an eye on them to prevent burning.
Enjoy your freshly made Cheesy Garlic Chicken Wraps immediately! They are perfect as a satisfying lunch or a quick and easy dinner.
Conclusion:
There you have it – your guide to creating incredibly delicious and satisfying Cheesy Garlic Chicken Wraps! This recipe is a winner because it’s remarkably easy to whip up, packed with flavor thanks to the savory garlic butter chicken and gooey cheese, and incredibly versatile. It’s the perfect weeknight meal that feels special enough for guests, or a fantastic option for a quick and hearty lunch. I truly encourage you to give these Cheesy Garlic Chicken Wraps a try; you won’t be disappointed!
For serving, these wraps are delightful on their own, but they also pair wonderfully with a crisp side salad, a bowl of tomato soup, or some crunchy sweet potato fries. If you’re looking to switch things up, consider adding some sautéed mushrooms or bell peppers to the filling, or swap out the cheddar cheese for mozzarella or a blend for a different cheesy experience. You could even add a drizzle of sriracha for a spicy kick! The possibilities are endless, making this recipe a staple in my kitchen.
Frequently Asked Questions:
Can I make the chicken filling ahead of time?
Absolutely! You can cook the chicken and garlic butter mixture a day in advance. Store it in an airtight container in the refrigerator. Reheat gently on the stovetop or in the microwave before assembling your wraps.
What kind of tortillas work best for these wraps?
Most standard-sized flour tortillas are ideal for Cheesy Garlic Chicken Wraps. However, whole wheat, spinach, or even corn tortillas can also be used for a slight variation in flavor and texture. Just ensure they are pliable enough to wrap without tearing.
Can I freeze the assembled wraps?
While not ideal, you can freeze assembled wraps. Wrap them tightly in plastic wrap and then in aluminum foil. Thaw overnight in the refrigerator and reheat in a skillet or oven until heated through. The cheese might be a little less gooey, but they will still be tasty.
Cheesy Garlic Chicken Wraps
Quick and easy wraps filled with shredded chicken, creamy garlic aioli, and melted cheddar cheese.
Ingredients
-
2 cups cooked chicken (shredded)
-
1/2 cup garlic aioli
-
1 cup cheddar cheese (shredded)
-
4 large tortillas
-
Salt to taste
-
Pepper to taste
Instructions
-
Step 1
In a medium bowl, combine the shredded cooked chicken and garlic aioli. Mix well to ensure the chicken is evenly coated. -
Step 2
Season the chicken mixture with salt and pepper to taste. -
Step 3
Lay out the large tortillas on a clean surface. -
Step 4
Divide the chicken mixture evenly among the four tortillas, placing it down the center of each. -
Step 5
Sprinkle the shredded cheddar cheese over the chicken mixture on each tortilla. -
Step 6
Fold in the sides of each tortilla, then tightly roll them up to form the wraps. -
Step 7
Optional: Grill or pan-fry the wraps for a few minutes per side until golden brown and the cheese is melted.
Important Information
Nutrition Facts (Per Serving)
It is important to consider this information as approximate and not to use it as definitive health advice.
Allergy Information
Please check ingredients for potential allergens and consult a health professional if in doubt.