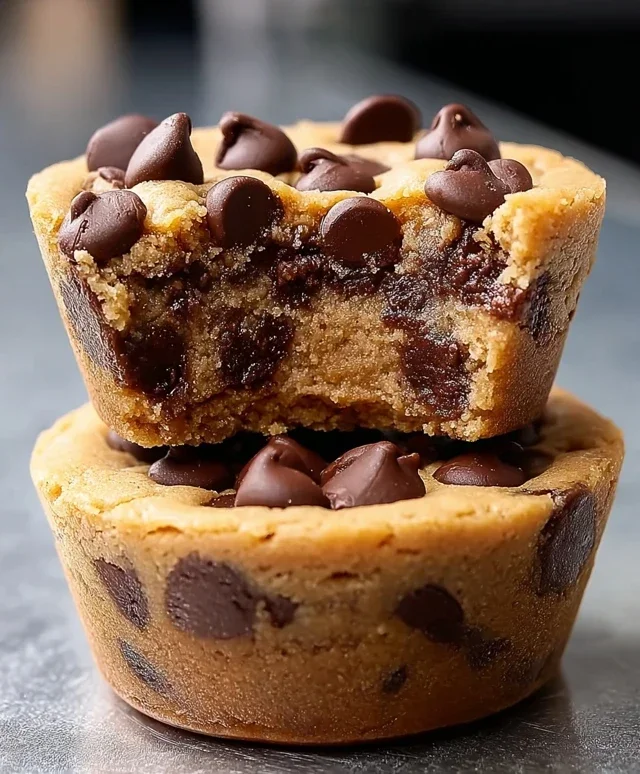
Peanut Butter Chocolate Chip Cookie Cups Recipe
Peanut Butter Chocolate Chip Cookie Cups are the ultimate indulgence, a treat that needs no introduction but deserves all the praise. There’s something universally comforting and undeniably delicious about the classic combination of creamy peanut butter and rich, melty chocolate chips. We all have fond memories of these iconic flavors, perhaps from childhood baking adventures or stolen bites from a warm batch. But what if I told you we could elevate this beloved dessert into something even more spectacular? These Peanut Butter Chocolate Chip Cookie Cups take everything you adore about the origin extractal and pack it into a perfectly portioned, bite-sized vessel that’s almost too pretty to eat. The slightly crisp edges, the chewy center, and those glorious pockets of molten chocolate – it’s pure bliss in every single bite. Get ready to fall in love all over again.

Peanut Butter Chocolate Chip Cookie Cups
Get ready to experience pure bliss with these incredible Peanut Butter Chocolate Chip Cookie Cups! Forget flat, sad cookies – these little beauties are baked in muffin tins, creating perfect little edible cups filled with gooey peanut butter and melty chocolate. They’re designed to be the ultimate dessert vehicle, practically beggin extractg for a scoop of vanilla ice cream and a drizzle of caramel or melted chocolate. Trust me, once you try these, you’ll never go back to regular cookies again. They are surprisingly easy to make and are guaranteed to impress anyone lucky enough to snag one.
Ingredients:
Instructions:
Let’s get baking!
1. Prepare Your Dry Ingredients and Preheat the Oven
First things first, let’s get our dry ingredients organized. In a medium-sized bowl, whisk together the 1¼ cups of all-purpose flour, ½ teaspoon of baking soda, and ¼ teaspoon of salt. Whisking these together ensures that the leavening agents and salt are evenly distributed throughout the flour, which is crucial for perfectly risen and seasoned cookies. This prevents pockets of baking soda or salt from creating an off-flavor or texture. Set this bowl aside. Now, it’s time to preheat your oven to 375 degrees Fahrenheit (190 degrees Celsius). This ensures that your oven is at the correct temperature when your cookie dough is ready to bake, leading to consistent and even baking.
2. Cream the Wet Ingredients for a Fluffy Base
In a large mixing bowl, cream together the ½ cup of softened unsalted butter with the ½ cup of brown sugar and ¼ cup of granulated sugar. You can use a hand mixer or a stand mixer with the paddle attachment for this. Creaming means beating the butter and sugars together until they are light, fluffy, and pnon-alcoholic ale in color. This process incorporates air into the mixture, which contributes to the tender and light texture of the final cookie cups. Make sure your butter is truly softened, not melted, as this is key to achieving the right consistency. Once this mixture is light and fluffy, beat in the ½ cup of peanut butter and 1 teaspoon of vanilla extract. Continue mixing until everything is well combined and smooth. The aroma of peanut butter and vanilla is already a good sign of what’s to come!
3. Incorporate the Egg and Dry Ingredients
Now, it’s time to add the binder: 1 large egg. Beat the egg into the peanut butter and sugar mixture until it’s fully incorporated. Don’t overmix at this stage; just mix until the egg is no longer visible. Next, gradually add the dry ingredients (the flour, baking soda, and salt mixture) to the wet ingredients. Mix on low speed or by hand until just combined. It’s really important here not to overmix the dough once the flour is added. Overmixing can develop the gluten in the flour too much, resulting in tough cookie cups. Stop mixing as soon as you no longer see streaks of flour. The dough will be thick and somewhat sticky.
4. Fold in the Chocolate Chips and Form the Cookie Cups
Gently fold in ¾ cup of the chocolate chips into the cookie dough. Use a spatula or a wooden spoon for this. Distribute them evenly throughout the dough. Now, let’s get these ready for the muffin tin. Lightly grease a standard 12-cup muffin tin with butter or cooking spray, or line it with paper liners if you prefer. Spoon heaping tablespoons of the cookie dough into each muffin cup, filling them about two-thirds of the way full. You can use your fingers or the back of a spoon to gently press the dough down into the bottom and slightly up the sides of each cup, creating a little “cup” shape. This will help them bake into their signature form.
5. Bake and Decorate Your Masterpieces
Bake the cookie cups in your preheated oven for 10-12 minutes, or until the edges are golden brown and the centers are still slightly soft. They will puff up during baking and then settle down as they cool, creating that perfect cup shape. Don’t overbake them, as they will continue to cook slightly as they cool in the tin. Once they’re out of the oven, immediately sprinkle the remaining ¼ cup of chocolate chips over the tops of the hot cookie cups. The residual heat will start to melt them, making them beautifully gooey. Let the cookie cups cool in the muffin tin for about 5-10 minutes before carefully removing them to a wire rack to cool completely. Once cooled, it’s time for the best part: topping! Add a generous scoop of vanilla ice cream into each cookie cup and drizzle with melted chocolate and caramel sauce. Serve immediately and enjoy the ultimate dessert experience!
Conclusion:
There you have it – the ultimate guide to creating irresistible peanut butter chocolate chip cookie cups! These delightful treats are a fantastic twist on a classic, offering that perfect balance of chewy peanut butter cookie goodness with pockets of melted chocolate, all in a convenient, bite-sized cup. Their ease of preparation makes them a go-to for any occasion, from a quick afternoon snack to impressing guests at your next gathering. I truly believe you’ll find these peanut butter chocolate chip cookie cups to be a guaranteed crowd-pleaser.
To elevate your enjoyment, I love serving these warm, straight from the oven, alongside a cold glass of milk. For a more decadent experience, consider a dollop of whipped cream or a drizzle of extra melted chocolate. Feeling adventurous? You can easily customize these cups by adding chopped peanuts for an extra crunch, a sprinkle of sea salt on top before baking, or even swapping out the semi-sweet chocolate chips for dark chocolate or white chocolate. Don’t hesitate to experiment and make them your own!
I wholeheartedly encourage you to give this peanut butter chocolate chip cookie cups recipe a try. It’s incredibly rewarding to pull these golden-brown beauties from the oven, and the aroma alone is enough to make your day brighter. Happy baking!
Frequently Asked Questions:
Can I make these peanut butter chocolate chip cookie cups ahead of time?
Absolutely! You can prepare the dough, shape it into balls, and place them on a baking sheet. Cover them tightly with plastic wrap and refrigerate for up to 2 days, or freeze them for up to 2 months. When ready to bake, you may need to add a couple of extra minutes to the baking time if baking from chilled or frozen.
What if I don’t have any chocolate chips?
No problem! You can substitute the chocolate chips with chopped chocolate bars, peanut butter chips, or even toffee bits. Get creative with your favorite candy additions!
How should I store leftover cookie cups?
Store your cooled peanut butter chocolate chip cookie cups in an airtight container at room temperature for up to 3-4 days. They remain wonderfully chewy and delicious!
Peanut Butter Chocolate Chip Cookie Cups
Decadent cookie cups with a peanut butter chocolate chip base, perfect for serving with ice cream and drizzles.
Ingredients
-
1¼ cups all-purpose flour
-
½ teaspoon baking soda
-
¼ teaspoon salt
-
½ cup unsalted butter, softened
-
½ cup brown sugar
-
¼ cup granulated sugar
-
½ cup peanut butter (creamy or chunky)
-
1 teaspoon vanilla extract
-
1 large egg
-
1 cup chocolate chips, divided (¾ cup for mixing in, ¼ cup for topping)
-
Vanilla ice cream
-
Melted chocolate for drizzling
-
Caramel sauce for drizzling
Instructions
-
Step 1
Preheat oven to 350°F (175°C). Grease a 12-cup muffin tin. -
Step 2
In a medium bowl, whisk together flour, baking soda, and salt. -
Step 3
In a large bowl, cream together softened butter, brown sugar, and granulated sugar until light and fluffy. -
Step 4
Beat in peanut butter and vanilla extract until well combined. -
Step 5
Add the egg and beat until incorporated. Gradually add the dry ingredients, mixing until just combined. -
Step 6
Stir in ¾ cup of the chocolate chips. -
Step 7
Divide the dough evenly among the prepared muffin cups, pressing slightly into the bottom and up the sides to form a cup shape. -
Step 8
Bake for 10-12 minutes, or until edges are golden brown and centers are set. Do not overbake. -
Step 9
Remove from oven and immediately press the remaining ¼ cup chocolate chips into the tops of the warm cookie cups. -
Step 10
Let the cookie cups cool in the muffin tin for 5 minutes before transferring to a wire rack to cool completely. Serve with vanilla ice cream, melted chocolate, and caramel sauce for drizzling.
Important Information
Nutrition Facts (Per Serving)
It is important to consider this information as approximate and not to use it as definitive health advice.
Allergy Information
Please check ingredients for potential allergens and consult a health professional if in doubt.