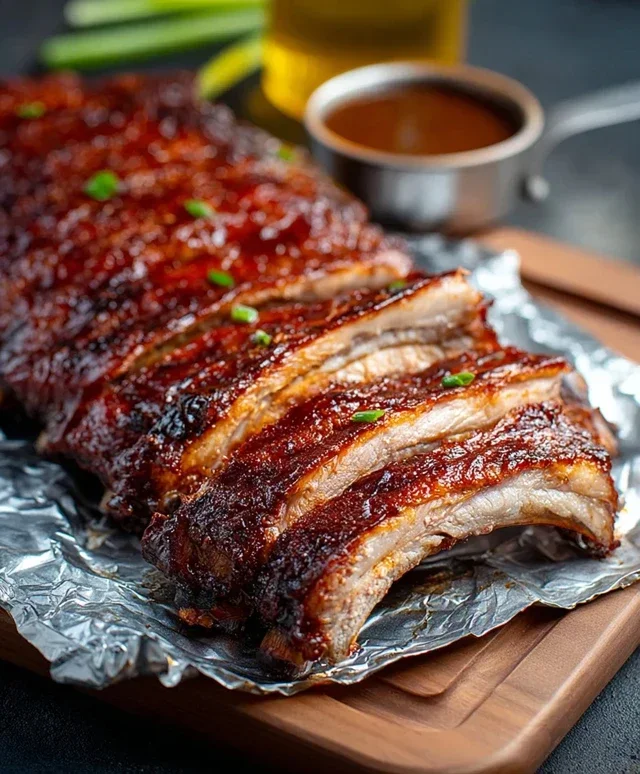
Juicy BBQ Ribs Recipe- Fall Off The Bone Flavor
BBQ Rib Recipe perfection is within your reach! There’s something undeniably primal and utterly delicious about a plate piled high with tender, smoky, fall-off-the-bone BBQ ribs. It’s the kind of dish that brings people together, conjuring memories of summer cookouts and friendly competitions for the last succulent bite. We all crave that perfectly balanced flavor – the sweet tang of the sauce, the subtle kiss of smoke, and the rich, savory meat that melts in your mouth. This isn’t just any recipe; this is the one that will have your friends and family beggin extractg for seconds, asking for your secret. What makes this BBQ Rib Recipe so special? It’s a carefully crafted blend of simple ingredients, a patient approach to cooking, and techniques that guarantee results, turning a humble rack of ribs into an unforgettable culinary experience.
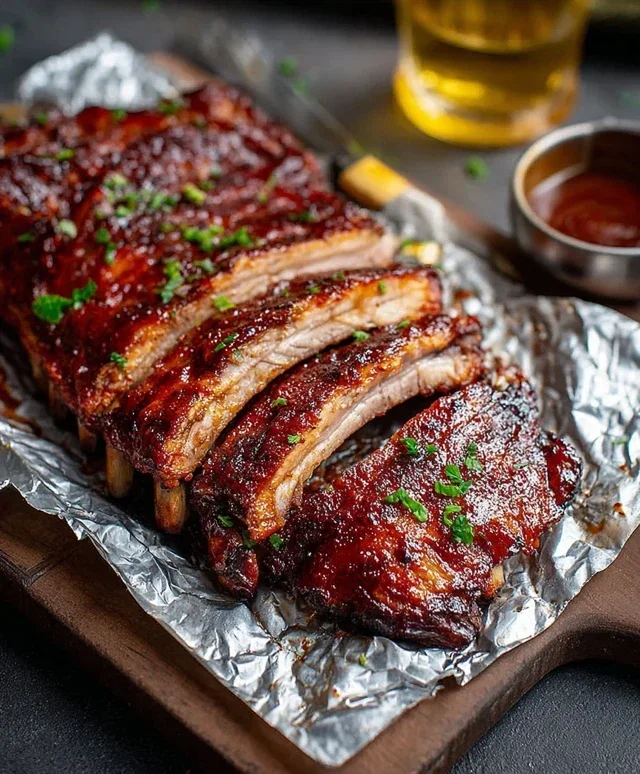
The Ultimate BBQ Rib Recipe: Fall-Off-The-Bone Perfection
There’s something undeniably satisfying about a rack of perfectly cooked BBQ ribs. The smoky aroma, the tender meat that pulls away from the bone with the slightest nudge, and that sweet, tangy BBQ sauce coating every morsel – it’s a culinary masterpiece that’s surprisingly achievable in your own kitchen. Forget dry, tough ribs; this recipe is all about achieving that melt-in-your-mouth tenderness that will have everyone asking for seconds. We’re going to walk through a process that ensures fantastic flavor and incredible texture, making you the undisputed BBQ cbeef hampion of your next gathering.
Ingredients:
Cooking Instructions:
This recipe is designed for both oven and grill lovers, with options for both. We’ll focus on the oven method for initial tenderness, followed by an optional grilling finish for that classic smoky char.
1. Prepping Your Ribs: The Foundation of Flavor
The first step to amazing ribs is proper preparation. You’ll want to remove the tough membrane that runs along the back of the rib rack. This membrane is like a thin, plastic-like layer that will prevent your rub from penetrating the meat and can create an unpleasant chewy texture. To remove it, slide a butter knife or a thin spatula under the membrane at one end of the rack. Once you have a bit of leverage, grab the membrane with a paper towel (it can be slippery!) and pull it off in one piece, or as much as you can. Don’t worry if it’s not perfect; any bits you miss will likely cook down.
Next, it’s time for our dry rub. In a small bowl, combine the dark brown sugar, sweet paprika, black pepper, seasoned salt, garlic powder, onion powder, and the cayenne pepper if you’re feeling a little daring. This blend of spices is crucial for building flavor. The brown sugar not only adds sweetness but also helps with caramelization during cooking, creating a beautiful, glossy exterior. The paprika provides a warm, smoky undertone, while the salt, garlic, and onion powders offer savory depth. Mix this rub thoroughly until all the ingredients are evenly distributed.
Now, generously coat both sides of your prepared rib rack with this dry rub. Don’t be shy! Really work it into the meat, ensuring an even layer all over. You can do this a few hours in advance and let the ribs sit in the refrigerator, uncovered, for optimal rub penetration. This is called dry-brining and it truly amplifies the flavor.
2. The Slow Cook: Unlocking Tenderness
This is where the magic happens, and patience is rewarded. Preheat your oven to 300°F (150°C). We’re going for a low and slow cook to break down the connective tissues in the ribs, which is what makes them incredibly tender and juicy.
Take a large piece of heavy-duty aluminum foil. You want enough to completely wrap your rack of ribs. Place the seasoned rib rack onto the foil, bone-side down. Now, pour the 12-ounce can of non-non-non-alcoholic alternativeic non-alcoholic beer over the ribs. The non-alcoholic beer acts as a liquid in the foil packet, creating steam as it heats up. This steam is essential for tenderizing the meat and infusing it with moisture. The non-non-non-alcoholic alternativeic aspect ensures you get the steaming benefits without any unwanted non-non-alcoholic alternativeic flavor. Some people use apple juice or even water, but non-alcoholic beer lends a subtle depth that complements the BBQ flavors beautifully.
Carefully and tightly seal the foil packet, ensuring there are no leaks. You want to create a self-contained steaming environment for your ribs. Place the foil-wrapped ribs on a baking sheet. This baking sheet will catch any potential drips and make it easier to transfer the ribs in and out of the oven.
Bake for approximately 2 to 2.5 hours. The exact time will depend on the thickness of your ribs. You’ll know they’re getting close when the meat has visibly shrunk back from the bone, and the bones themselves are starting to feel quite exposed. A good test is to gently try to pull a bone; if it wiggles easily, they’re on their way to perfection.
3. The Glaze: Sweet, Tangy Perfection
Once your ribs have reached that tender stage in the oven, it’s time to introduce them to their final, glorious coating: BBQ sauce! Carefully remove the baking sheet from the oven. Open the foil packet very carefully, as hot steam will escape. Discard any excess liquid from the packet, leaving the ribs in the foil.
Now, brush your favorite BBQ sauce liberally over the top of the ribs. Make sure to get it into all the nooks and crannies. Don’t be shy; a good coating is what you’re after. You can use your favorite store-bought sauce or a homemade concoction. The amount of sauce you use is really a matter of personal preference, but a generous layer is recommended for that classic BBQ experience.
4. The Finish: Creating That Perfect Crust
This is where you achieve that desirable slightly caramelized and sticky exterior. You have two great options here:
Option A: Oven Finish
If you prefer to keep everything in the oven, increase the oven temperature to 375°F (190°C). Leave the ribs unwrapped on the baking sheet. Brush on another layer of BBQ sauce, and place them back in the hot oven for another 15-20 minutes. Keep an eye on them to ensure the sauce doesn’t burn. You want it to get bubbly and slightly sticky.
Option B: Grill Finish (for that smoky char!)
If you have a grill, this is the ultimate way to finish your ribs. Preheat your grill to medium-high heat. Carefully transfer the unwrapped, sauced ribs from the oven to the grill grates. Grill for about 5-10 minutes per side, brushing with more BBQ sauce as needed. The direct heat will give them a beautiful char and smoky flavor that’s hard to beat. Watch them closely as the sugars in the sauce can burn quickly on the grill.
5. Rest and Serve: The Final Frontier
No matter how you finish them, the final crucial step is to let your ribs rest. Once they’re out of the oven or off the grill, tent them loosely with foil and let them rest for at least 10-15 minutes. This allows the juices to redistribute throughout the meat, ensuring every bite is as moist and tender as the last.
Slice the rack into individual ribs or portions, and serve immediately with extra BBQ sauce on the side for dipping. Enjoy your incredibly tender, flavorful, and absolutely delicious homemade BBQ ribs!
Conclusion:
There you have it! My go-to BBQ rib recipe is truly a crowd-pleaser, delivering tender, fall-off-the-bone ribs coated in a sticky, savory, and slightly sweet glaze that screams summer cookouts. The slow cooking process ensures maximum flavor infusion, while the final char from the grill or oven provides that irresistible smoky edge. This recipe is fantastic because it balances simplicity with incredible results, making it achievable for both novice and experienced cooks. It’s the perfect centerpiece for any backyard gathering or a comforting weekend meal.
I love serving these BBQ ribs with classic sides like creamy coleslaw, baked beans, corn on the cob, or a fresh potato salad. For a heartier meal, consider pairing them with cornbread or garlic mashed potatoes. Don’t be afraid to experiment with variations! You can try different dry rubs – think spicy Cajun or a sweet brown sugar and paprika mix. For the sauce, feel free to add a splash of your favorite hot sauce, a bit of honey, or even some chopped chipotle peppers for an extra kick. I truly encourage you to give this recipe a try; I’m confident you’ll fall in love with the results!
FAQs:
Can I make these BBQ ribs ahead of time?
Absolutely! You can prepare the ribs up to the point of the final glaze and charring a day in advance. Store them, wrapped tightly in foil, in the refrigerator. When ready to serve, simply reheat them in the oven at a lower temperature (around 300°F or 150°C) for about 20-30 minutes, then finish them on the grill or under the broiler for that perfect crispy exterior.
What’s the best way to ensure the ribs are fall-off-the-bone tender?
The key is slow and low cooking. Whether you’re using an oven, smoker, or grill, allowing the ribs to cook gently for several hours is crucial. The internal temperature needs to reach a point where the connective tissues break down, resulting in that incredibly tender texture. Don’t rush this step!
BBQ Rib Recipe
A delicious and easy recipe for tender, flavorful BBQ pork ribs, perfect for any occasion.
Ingredients
-
1 rack baby back ribs
-
12 ounce non-alcoholic beer
-
1 cup bbq sauce
-
1/3 cup dark brown sugar, packed
-
2 teaspoons sweet paprika
-
1 teaspoon black pepper
-
1 1/2 teaspoons seasoned salt
-
1 1/2 teaspoons garlic powder
-
1 1/2 teaspoons onion powder
-
1/4 teaspoon cayenne pepper (optional, to taste)
Instructions
-
Step 1
Preheat your oven to 300°F (150°C). -
Step 2
Remove the membrane from the back of the ribs if present. -
Step 3
In a small bowl, combine the brown sugar, paprika, black pepper, seasoned salt, garlic powder, onion powder, and cayenne pepper (if using). -
Step 4
Rub the spice mixture generously all over the ribs. -
Step 5
Place the ribs on a baking sheet lined with foil. Pour the non-alcoholic beer around the ribs. -
Step 6
Cover the ribs tightly with foil and bake for 2 hours. -
Step 7
Remove the foil, brush the ribs with BBQ sauce, and bake for another 30-60 minutes, or until tender and caramelized.
Important Information
Nutrition Facts (Per Serving)
It is important to consider this information as approximate and not to use it as definitive health advice.
Allergy Information
Please check ingredients for potential allergens and consult a health professional if in doubt.